Table of contents:
IBC vs IBController – which one to choose?
Locate Amazon EC2 Ubuntu 18.04 image and run it
Create "ubuntu" user (if missing)
Install 2 copies of IBC (v3.8.1)
Install xvfb – Virtual Framebuffer 'fake' X server
Install VNC server to allow remote access to an existing X session
Install TWS (offline version build 976.2p)
secure box: option #1: Leave “as is”
secure box: option #2: By firewall rules: Only allow connections from known IP / range of IPs
secure box: option #3: Firewall: Only allow local connections
secure box: paranoia-to-the-max option: client use ssh-tunnel to access TWS API
How to restart TWS once a day?
Alternative lower level IBC+TWS restart (if you haven't registered them as self-starting services)?
Note #1: Fine tunning ssh config (to automate port forwards)
Note #2: There’s NO need to install Java (OpenJDK 8). It can be even harmful!
But if you still want to experiment with manual install of the latest Java
What’s it all about?
This doc describes steps to install the following components (as of 01-Aug-2019):
– IBC (latest release: v3.8.1: IBCLinux-3.8.1.zip)
– Interactive Broker Offline TWS Latest for Linux (Version 976)
We’ll set up 2 instances of TWS running on the same Ubuntu box (18.04LTS) in parallel. One TWS will use real IB account and the other will use paper account. (and nothing stops us from having more than 2 TWS if only we have access to more accounts, once I run 4 TWSes on one box for couple months:).
This doc is not intended to be “full guide” rather it is a “very short cheat sheet”, which logs the steps to set it all up without much explanation as of “why this or that” and without extra precaution measures (like creating secure folders and such)
Please read the original: TWS-API docs and IBC guide to get the fullness of info.

If you have any improvements/suggestion, please drop me an email.
I hope it will save some time for someone,
Dmitry Shevkoplyas
IBC vs IBController – which one to choose?
In short: Use IBC.
IBController has been superseded by IBC: https://github.com/IbcA lpha/IBC, so you definitely want to upgrade to actively developed/supported IBC and drop stale IBController.
See "Important Notice About IBController":
https://groups.io/g/twsapi/topic/important_notice_about/14774101
I suggest you join the IBC User Group and post your question there. Also, it would be in your interest to upgrade to IBC.
Locate Amazon EC2 Ubuntu 18.04 image and run it
For this exercise let’s use empty Ubuntu box on Amazon EC2 cloud (easy to create/replace do backups/snapshots and does not produce noise in your house;).
Alternatively, you can download Ubuntu ISO and install it on your home/office box.
We will use Ubuntu Amazon EC2 AMI Finder – Ubuntu Cloud Images to find empty ubuntu box image.
Search criteria for Amazon cloud provider:
zone: us-west-1 (N.California)
version: 18.04 LTS
Instance type: hvm:ebs-ssd
Search result: ami-063aa838bd7631e0b
As for the instance type – for our purposes, t2.large should be more than enough (it has 2 CPU Cores, 8G of RAM, 8G SSD HDD, 9.3 cents/hour (magnetic HDD is also fine, though slower and may be cheaper)). Use this awesome Amazon EC2 Instance Comparison Tool to select good instance type for your needs (allows select rows and compare selected, customizable columns, shows pricing etc.)
Ubuntu box is up and running! Let’s check it’s version:
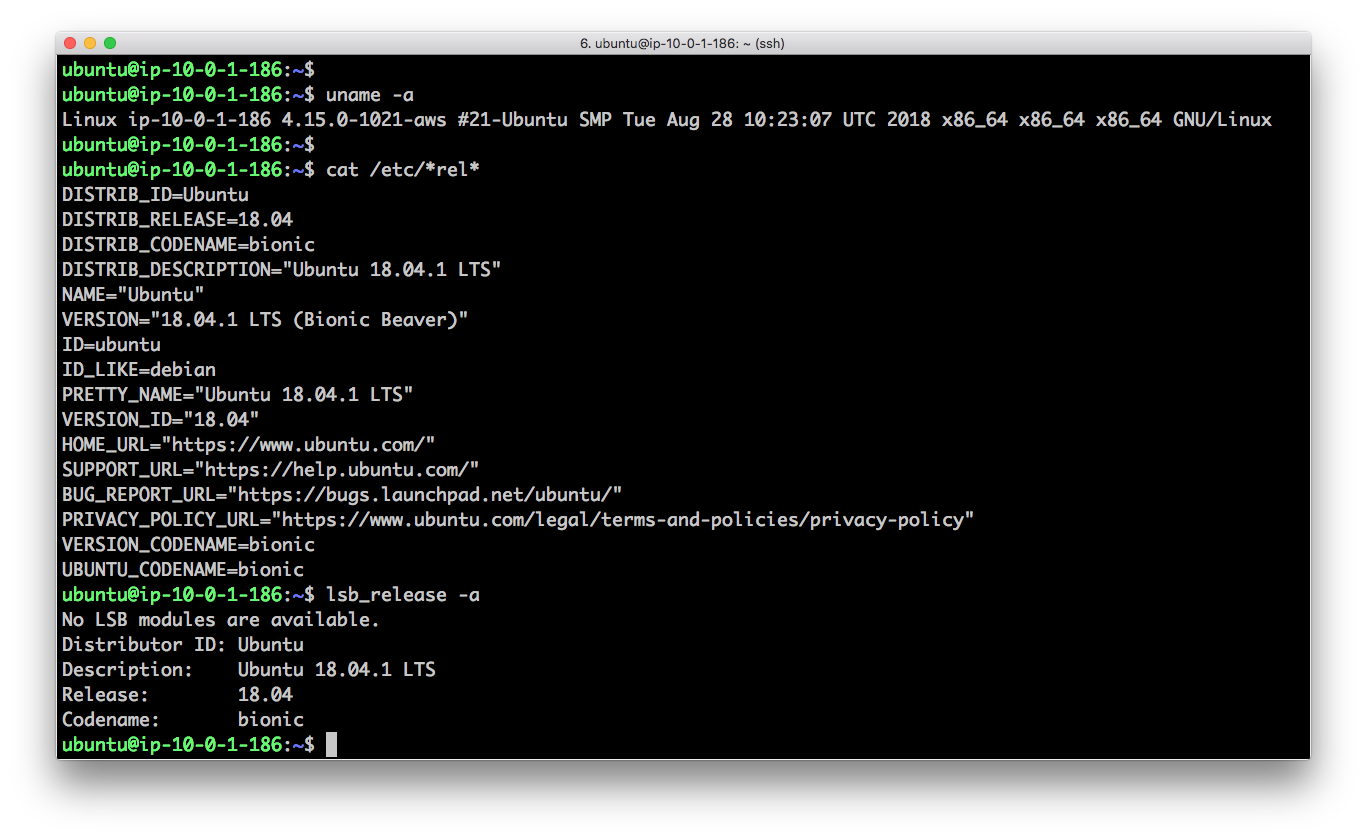
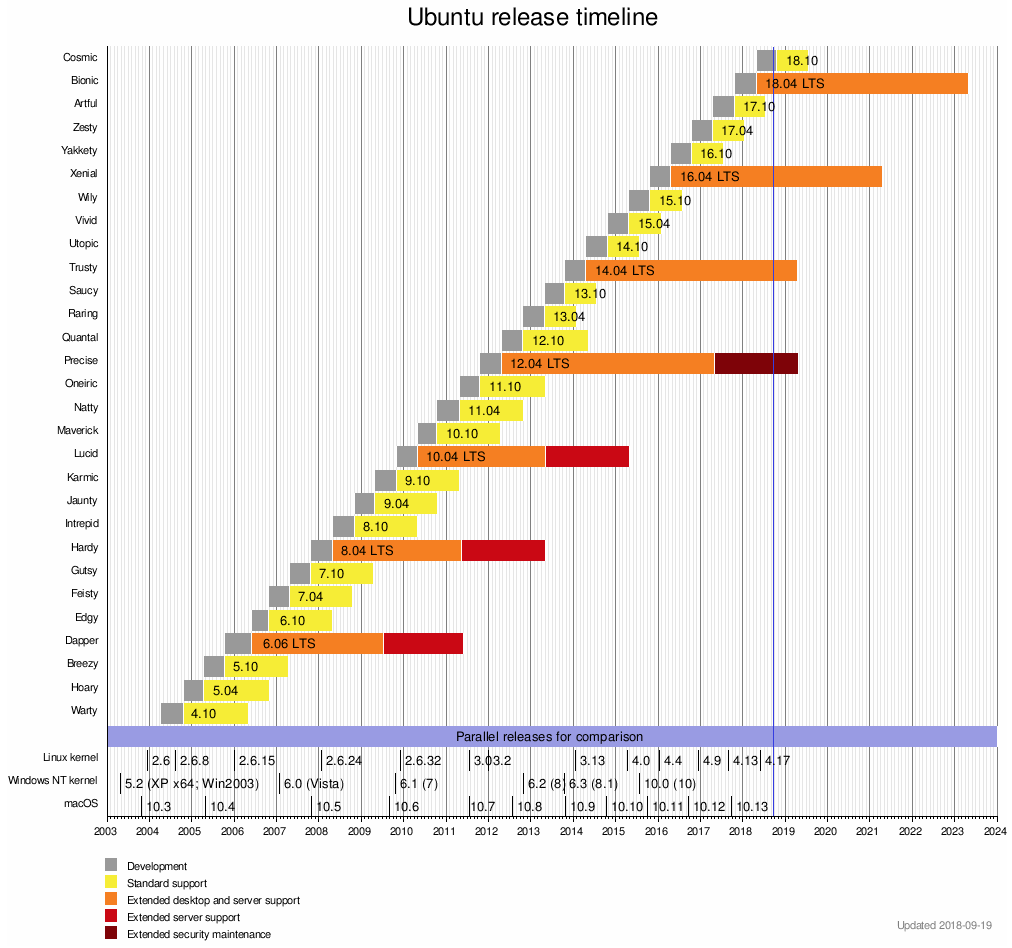
Why Ubuntu 18.04?
Because it is the latest Long-Term Support (LTS) release that will be supported by Canonical until April 2023!
Check this timeline out: https://en.wikipedia.org/wiki/List_of_Ubuntu_releases
Chosen 18.04 is the latest LTS so far on this beautiful image:
Create "ubuntu" user (if missing)
To check if user "ubuntu" is present you can check if /home/ubuntu/ folder is present:
# use 'file' command to indirectly check evidence of "ubuntu" user present by
# his/her home folder present:
file /home/ubuntu/
# another rather proper way to check if user exists by username is "id" command:
id -u ubuntu
# Example:
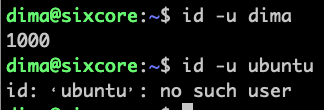
# if you get something like "No such file or directory", let's create "ubuntu" user
useradd -d /home/ubuntu -s /bin/bash -m ubuntu
# create a new password for "ubuntu" user. Make it hard to guess, but don't forget it youself 😉
passwd ubuntu
# give "ubuntu" user sudo privileges
adduser ubuntu sudo
# Easy way to make "ubuntu" user be able to "sudo" without password asked:
# simply add the following line at the end of "/etc/sudoers" file
ubuntu ALL=NOPASSWD: ALL
# Alternatively you can go harder way – create file "/etc/sudoers.d/ubuntu"
# and place the above "no password" 1-liner into that file, then you'd
# chmod 0440 that file and use "visudo" to uncomment
# the following directive: "includedir /etc/sudoers.d"
# in the "/etc/sudoers" file
# Read more on that alternative way here:
sudo cat cat /etc/sudoers.d/README
Update/upgrade fresh Ubuntu installation
Let's run general "household" steps after ubuntu installation. Say for example our remote ubuntu got IP address 1.2.3.4:
ssh ubuntu@1.2.3.4
sudo apt update
sudo apt -y upgrade
Install 2 copies of IBC (v3.8.1)
To figure out which is the latest IBC release point your browser to:
https://github.com/IbcAlpha/IBC/releases/
As of today (August 1st) we see version 3.8.1 is the latest IBC release:

As "ubuntu" user: download and unzip the latest IBC:
mkdir ~/ibc.paper
cd ~/ibc.paper/
wget https://github.com/IbcAlpha/IBC/releases/download/3.8.1/IBCLinux-3.8.1.zip
sudo apt install -y unzip
unzip IBCLinux-3.8.1.zip
Make two identical copies of "ibc" folder (we'll use one for “real” and one for “paper” account):
cp -r ~/ibc.paper ~/ibc.real
Install xvfb – Virtual Framebuffer 'fake' X server
Let us add simplistic graphical user interface support on remote ubuntu:
Install xvfb – Virtual Framebuffer 'fake' X server:
sudo apt install -y xvfb
For now just run virtual frame buffer manually:
/usr/bin/Xvfb :0 -ac -screen 0 1024x768x24 &
Or even twice bigger screen (only if you want to see big TWS charts remotely)
/usr/bin/Xvfb :0 -ac -screen 0 2048x1536x24 &
Expected output: process ID (PID) of Xvfb running in the background. Example:
[1] 3149
Install VNC server to allow remote access to an existing X session
Let's install VNC server on remote Ubuntu (to access TWS GUI remotely):
sudo apt install -y x11vnc
Prepare a log file as root (remember: we run everything as "ubuntu" user, which is not allowed to create new files under "/var/log" folder):
sudo touch /var/log/x11vnc.log
sudo chmod a+rw /var/log/x11vnc.log
Run VNC server (note – it has 2 passwords: one for "view only" other for "full access with keyboard and mouse"). This command is just one looong-long line, where we call "x11vnc" with a bunch of parameters:
/usr/bin/x11vnc -ncache 10 -ncache_cr -viewpasswd remote_view_only_pass -passwd some_pass123 -display :0 -forever -shared -logappend /var/log/x11vnc.log -bg -noipv6
Expected output from the above command is the port number VNC is listening on:
PORT=5900
Connect to remote ubuntu box from your laptop using any VNC client, like:
RealVNC or TightVNC Java Viewer Version 2 both work on windows/mac and free.
Note: you might want to add an inbound rule into your Amazon Security Group to allow inbound traffic to port 5900 (later on we won't need it because we will use ssh tunnel to access VNC and SSH is the only allowed port (:22) by default in Amazon new security group).
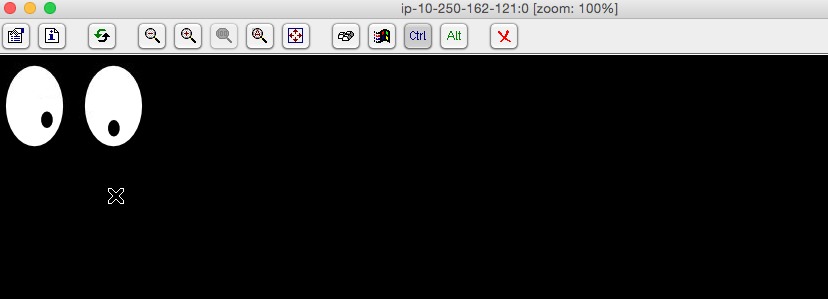
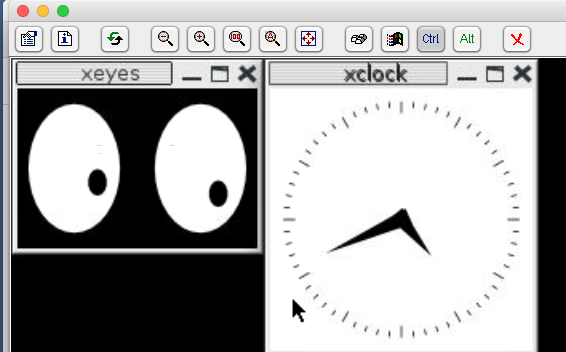
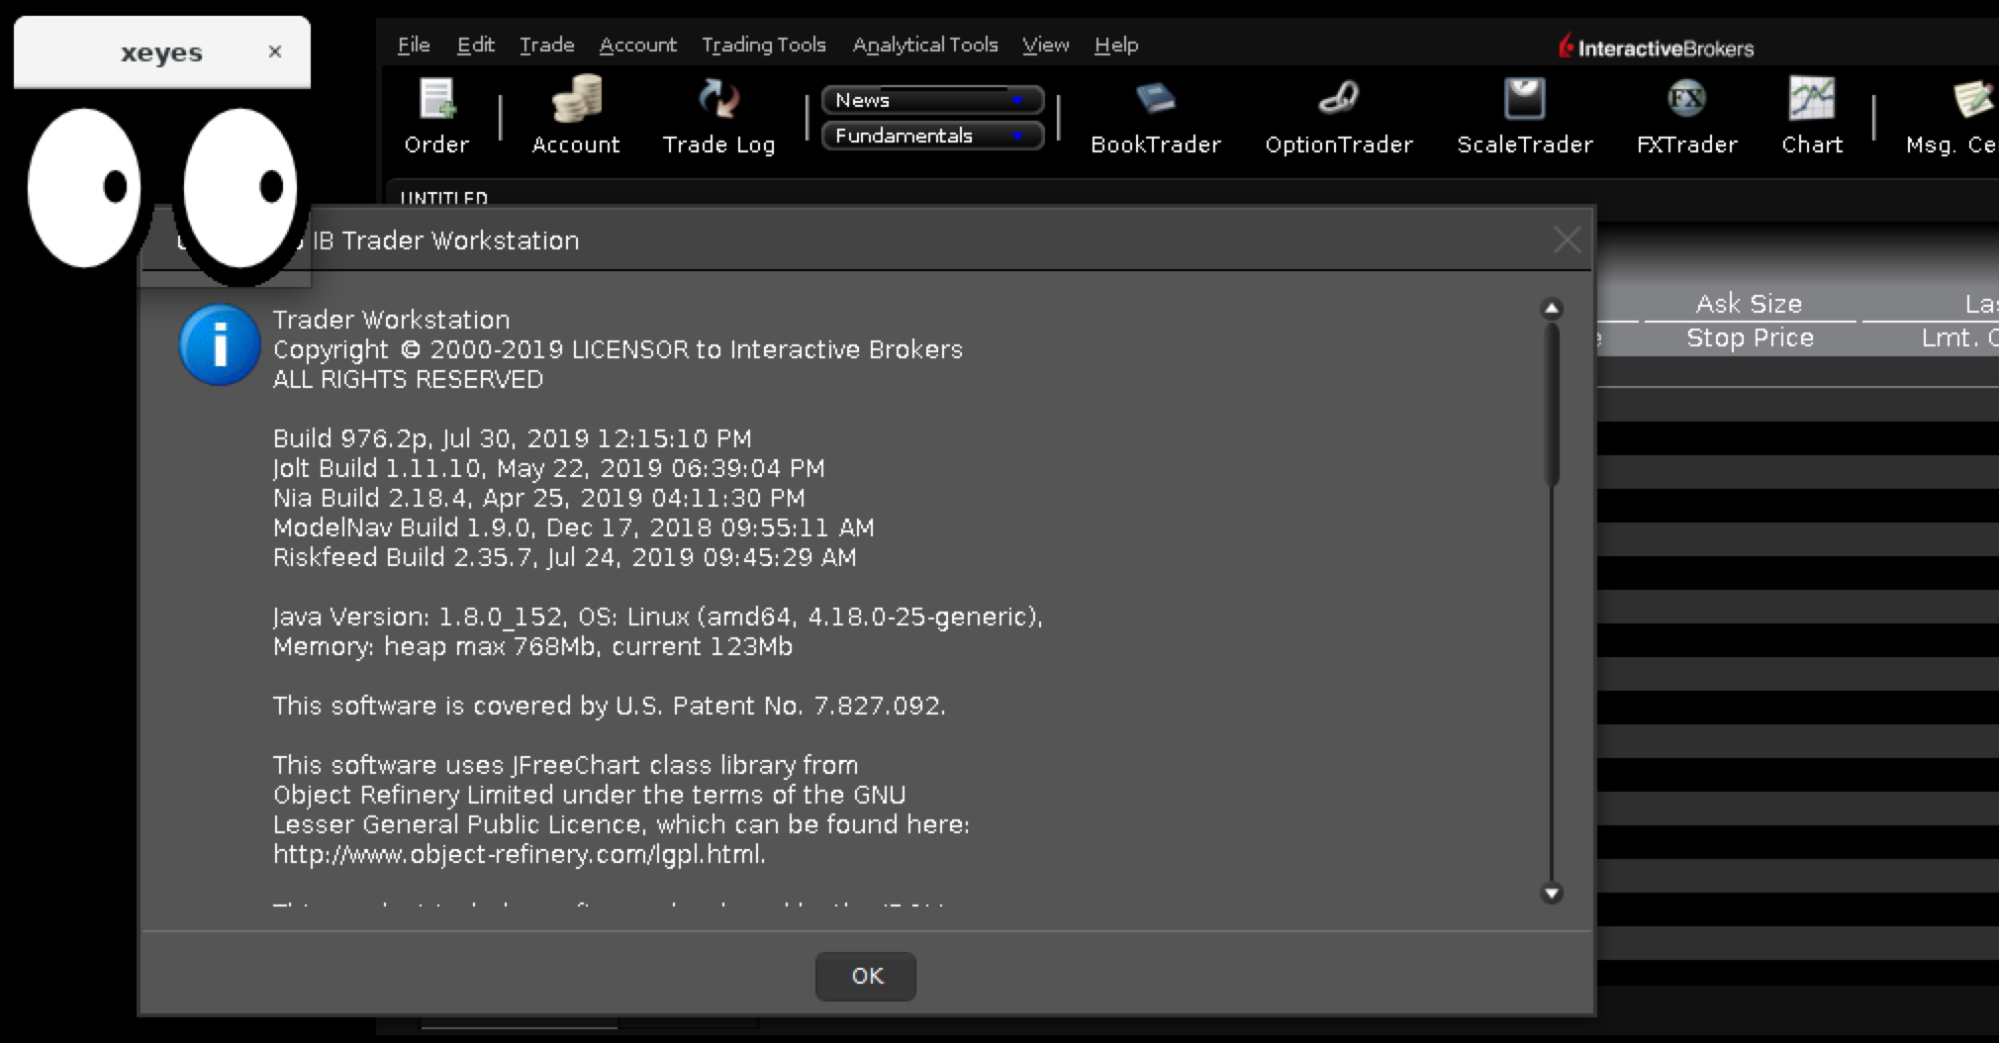
Just for fun/debug we can run simple X app “xeyes” to check if our virtual DISPLAY=:0 is working as expected:
sudo apt install -y x11-apps
DISPLAY=:0 xeyes &
Look! Here we have couple eyeballs tracking our mouse move!-)
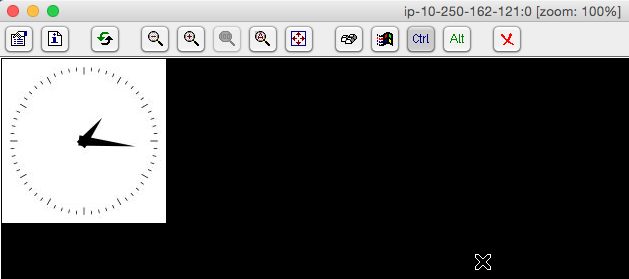
Also, we can run xclock (from same “x11-apps” package) or xterm (to check keyboard input via VNC):

Here's the expected result:
So far there is no window manager installed, so all graphical apps do not have a header (makes it hard to move them around). I’d recommend to add “metacity” – lightweight GTK+ window manager:
sudo apt install -y metacity
DISPLAY=:0 metacity &
Notice how all our windows now have a header with "title", "close" and "maximize" buttons:
Install TWS (offline version build 976.2p)
Get the latest offline TWS version:
Using your local PC (whether it is windows or mac – does not matter)
Let's search for: Offline TWS Latest
We found:
Offline TWS Latest – | Interactive Brokers
https://www.interactivebrokers.com/en/index.php?f=16044&ns=T
Follow the link above and click on "Download for Other Operating Systems", then choose "Linux 64 bit" and download the file "tws-latest-standalone-linux-x64.sh" onto your local PC.
Note: there’s no easy way to get a direct link to this downloadable file since IB’s webpage uses some javascript magic and require you to click “download” button to start the file transfer, which is much easier to do from your local machine browser, not directly from remote “empty ubuntu” box command line.
After the download is complete we will upload the file to remote ubuntu using “scp” utility (read: "over ssh").
Upload tws installer from your local PC to your “remote empty ubuntu” box to "ubuntu" user home folder (where 1.2.3.4 is public IP of your ubuntu box):
scp ~/Downloads/tws-latest-standalone-linux-x64.sh ubuntu@1.2.3.4:
On remote box: make uploaded tws installer executable:
chmod a+x ~/tws-latest-standalone-linux-x64.sh
Since now we have ubuntu with GUI lets run TWS installer on display ":0":
DISPLAY=:0 ~/tws-latest-standalone-linux-x64.sh
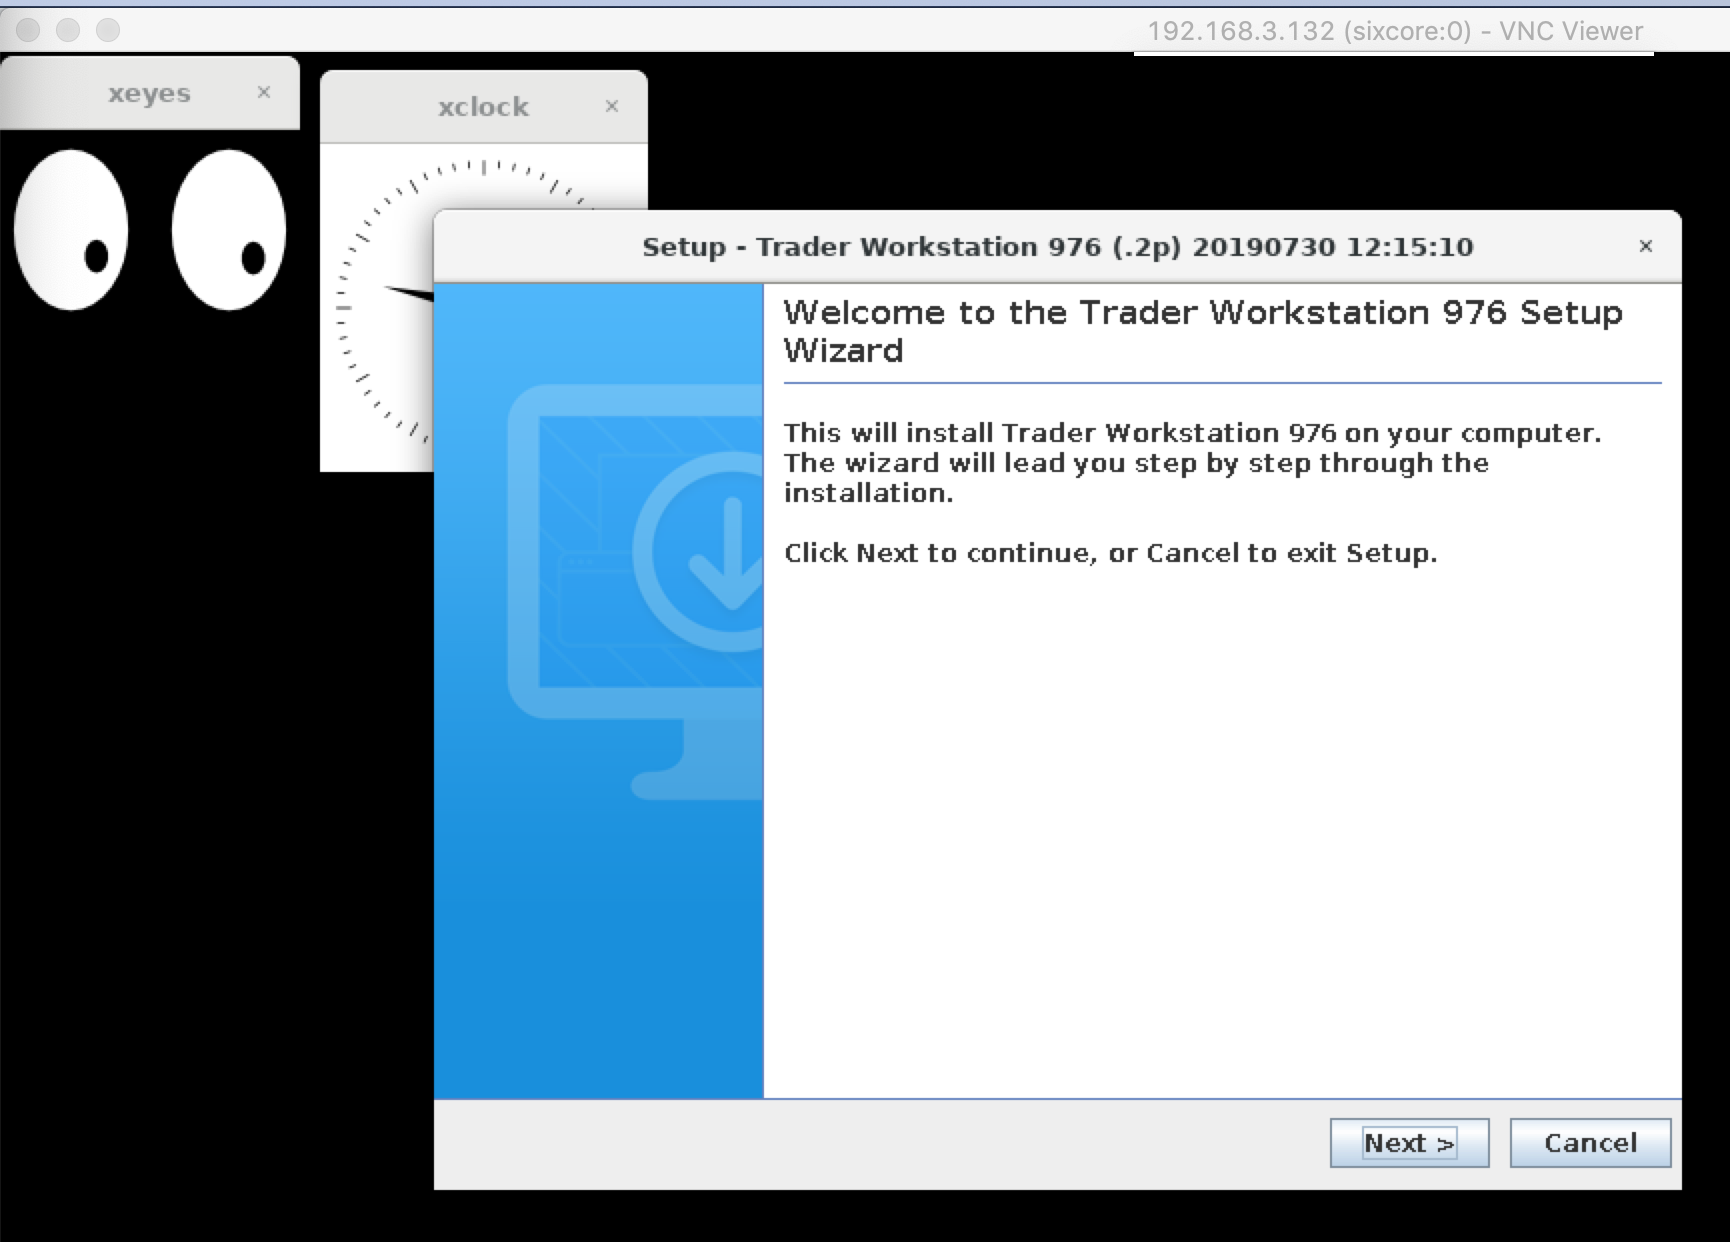
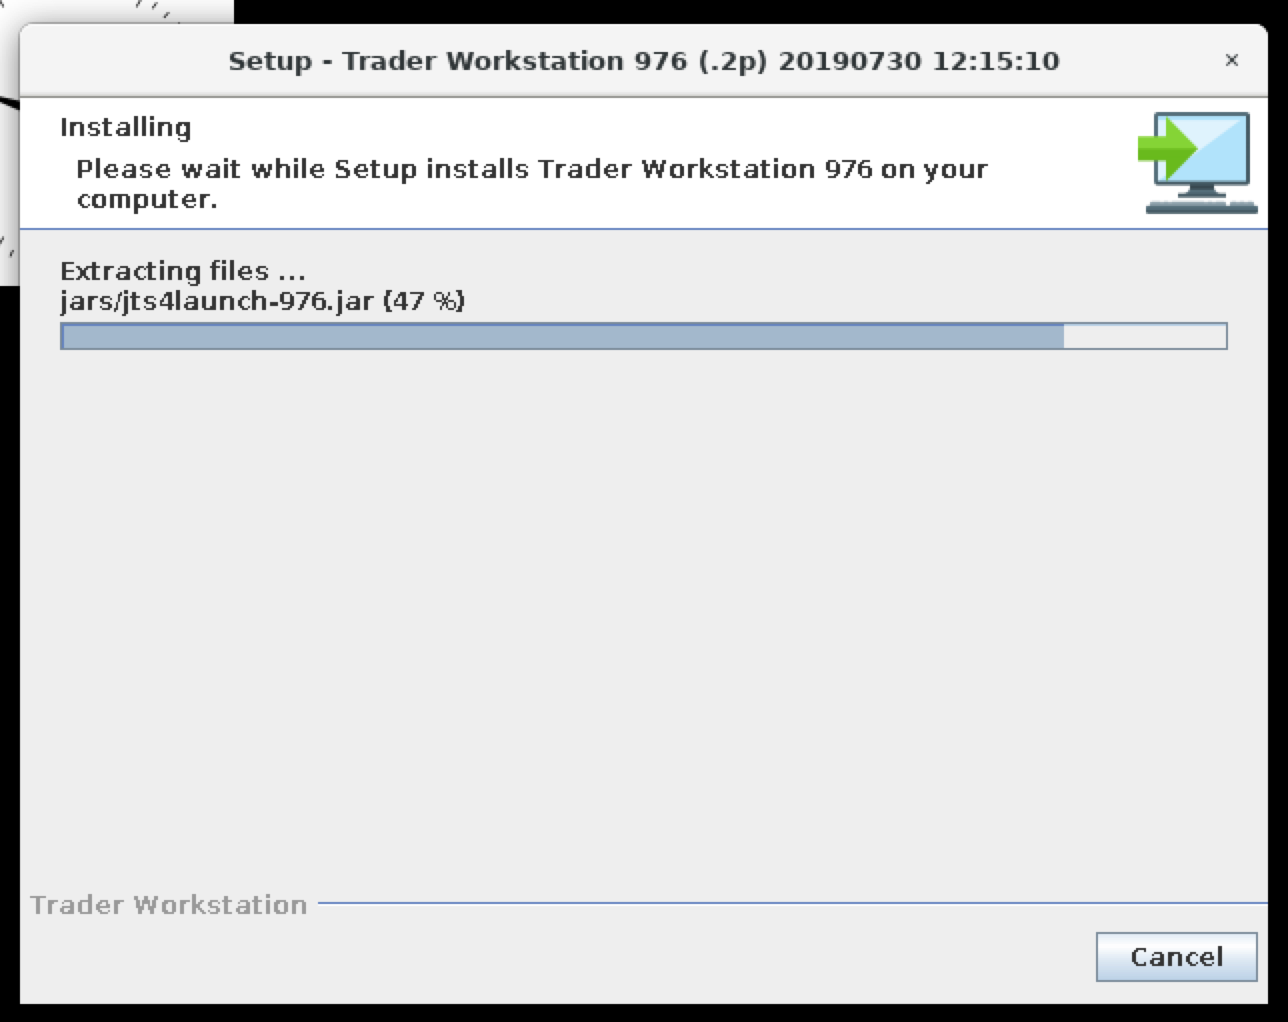
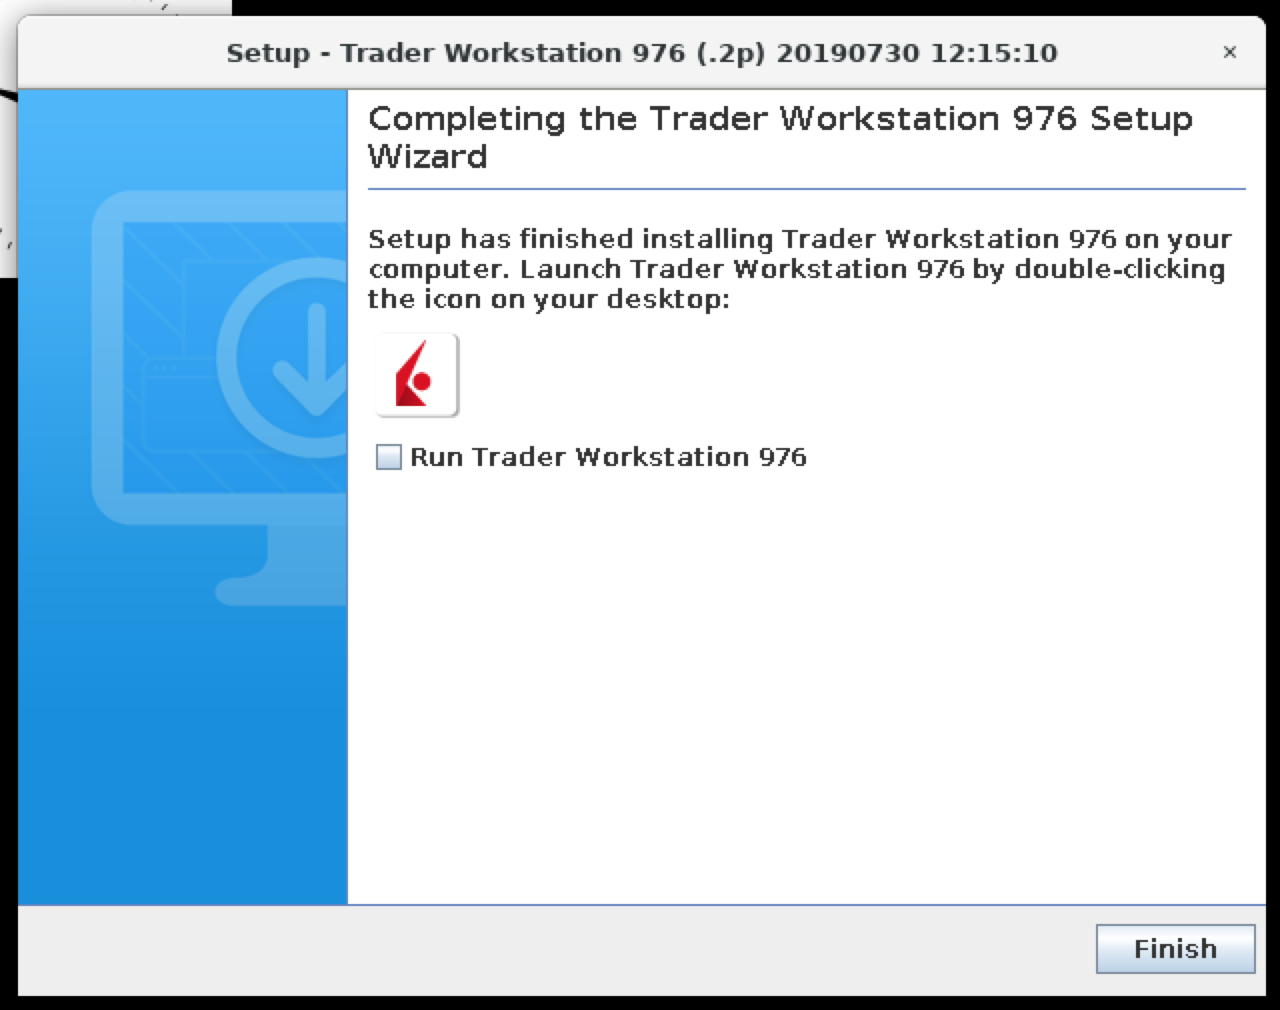
We can put the checkbox "Run Trader Workstation 976" and click "Finish".
Here we have TWS installed/running on headless Ubuntu 18.04 LTS:
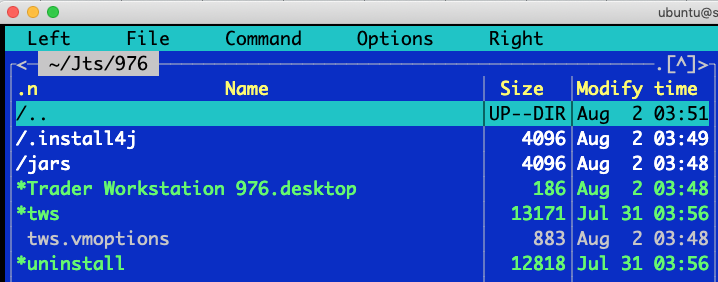
TWS installed under the following location:
/home/ubuntu/Jts/
Note: I use “midnight commander” to navigate file system and edit files.
You can try it by installing:
sudo apt install -y mc
To run it use command:
mc
To exit – use F10 button. To navigate – use arrows, enter, tabs. To edit files – use F4 (contextual help on what functional key is doing what is always available in the bottom line).
Start and configure TWS
Let us start TWS manually 1st time to configure few things. Your TWS might be still running by TWS installer from the previous step in which case close it now.
Just out of curiosity – the size of Jts folder is about 91Mb:
du -hs ~/Jts/
91M /home/ubuntu/Jts/
To start TWS manually from command line:
cd ~/Jts/976/
DISPLAY=:0 ./tws
Note: in the terminal, you might see the error like this:
(quote)
Error initializing QuantumRenderer: no suitable pipeline found
java.lang.RuntimeException: java.lang.RuntimeException: Error initializing QuantumRenderer: no suitable pipeline found
(end of quote)
Which you can safely ignore. Or you can fix it by installing "openjfx" (about 200MB)
sudo apt-get install openjfx
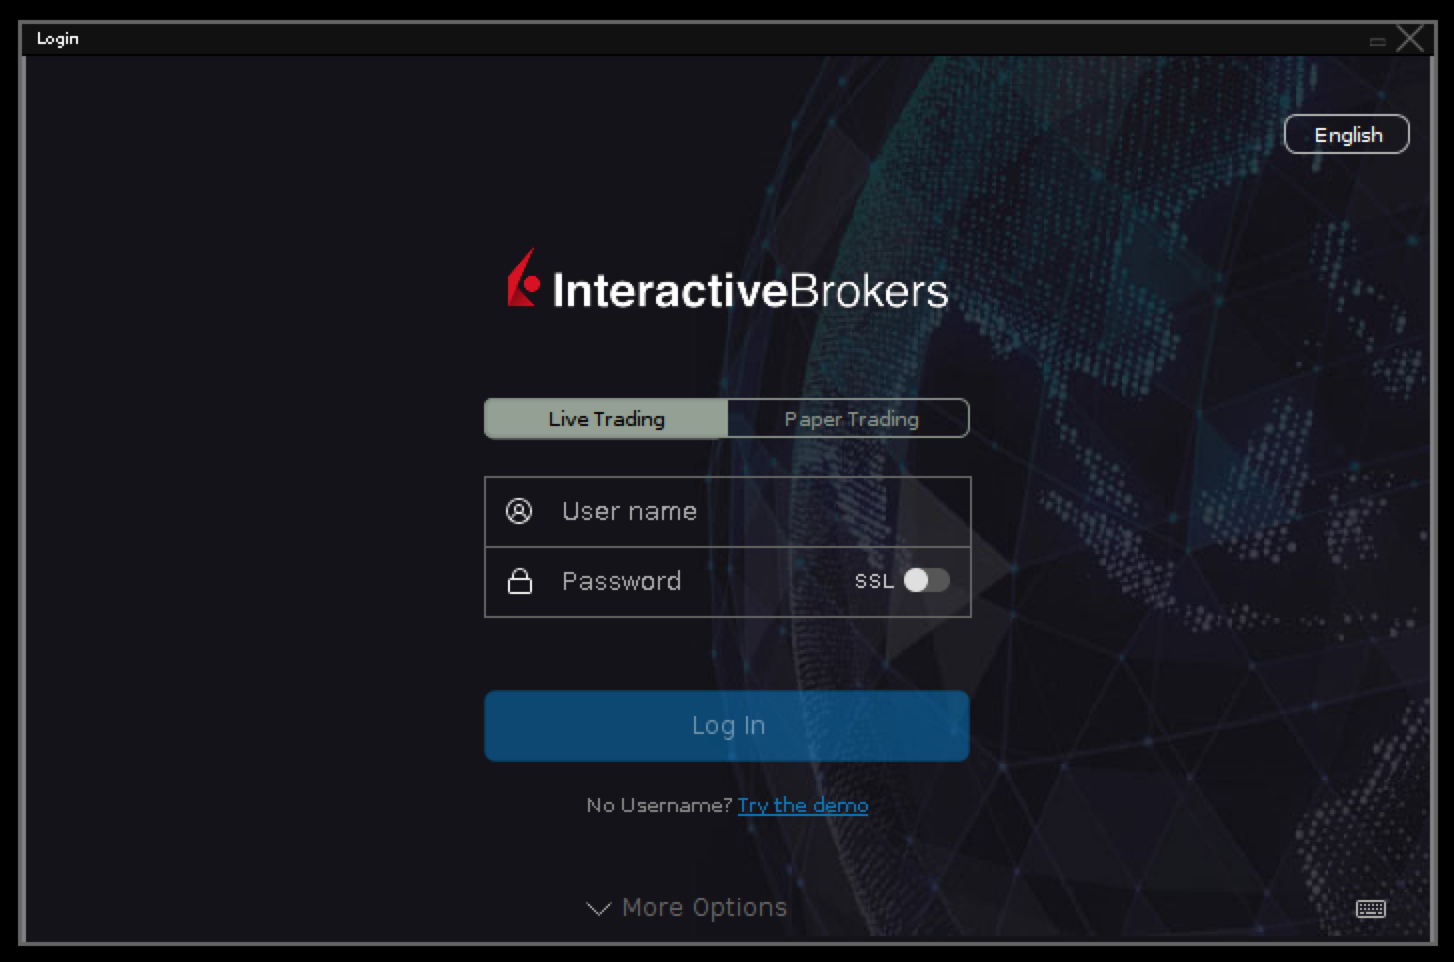
Now use VNC client to connect to remote Ubuntu desktop, then login to TWS with your credentials and here you have it:
Edit TWS configuration:
Unfortunately, IB pooled my older settings from the server, so I’m not sure how empty 1st-time-ever settings page should look like, but here’s the example of the workable set.
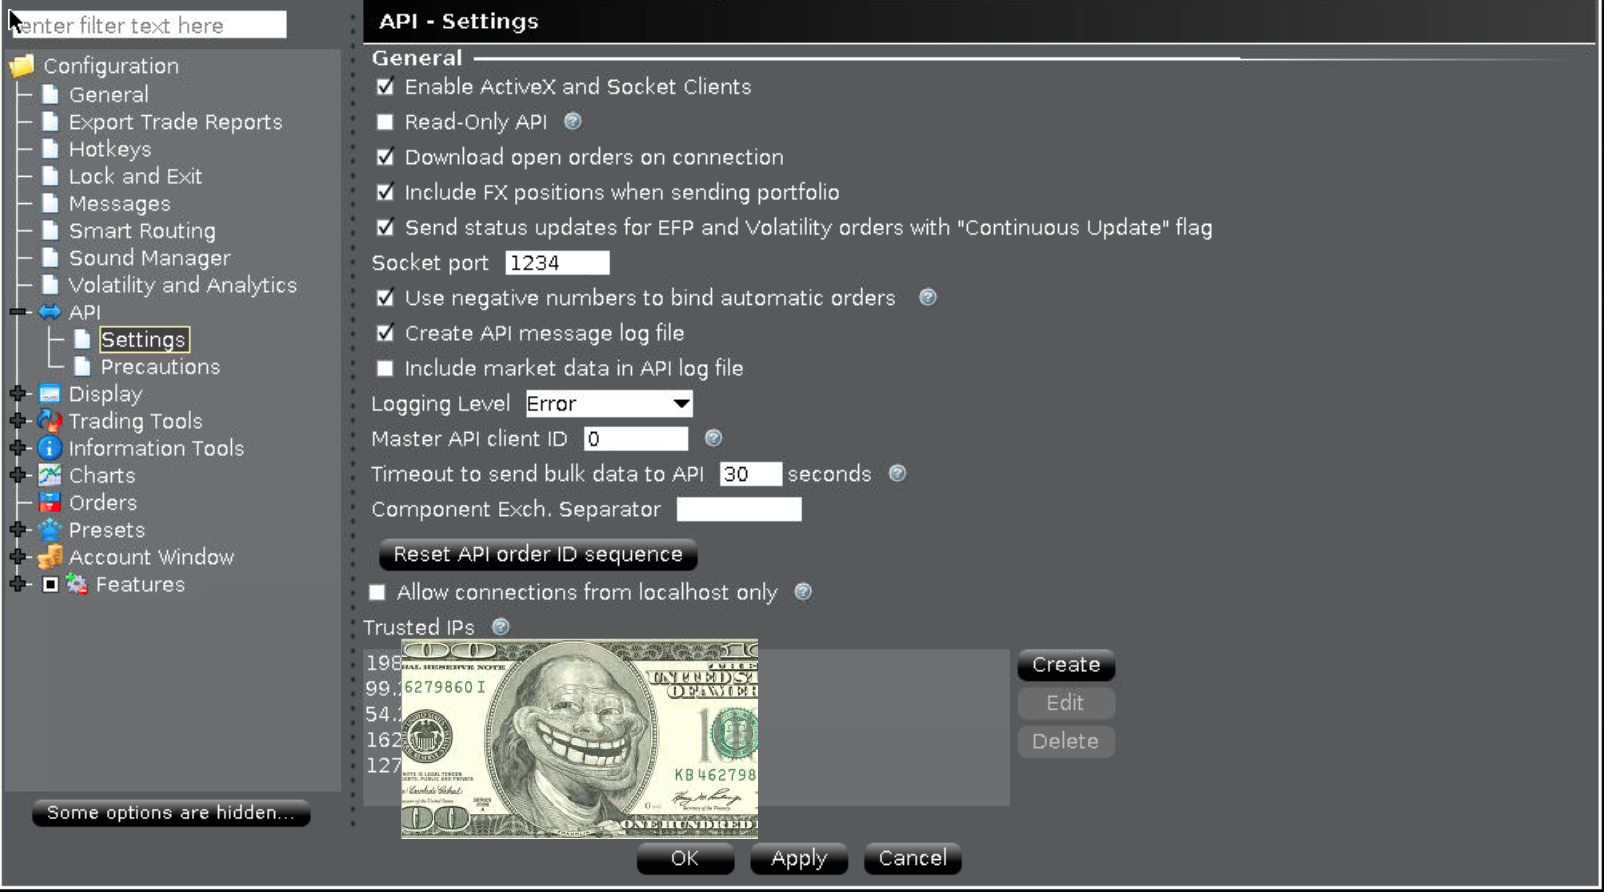
Note: "Enable ActiveX and Socket Clients" checkbox should be checked, "Socket port" should be set, "Create API message log file" might be useful some day, you can add "Trusted IPs" into the list, only those specified will be able to talk to TWS "Socket port". Little note on "Trusted IPs" – this mechanism is rather "poor man protection" since it won't even stop other (potentially "bad guys") IP addresses from connecting to your socket port. It will eventually disconnect them, but before that there are some packets exchange, so "bad guys" can try to buffer overflow or some other nasty stuff against your open port. It would be wiser to restrict down to IP list (or subnetwors list) not in the application level, but in the firewall (see iptables) or in case of cloud providers they usually provide some means to only allow certain ports / IP's (for Amazon see "security groups").
Note: if you intend to run 2 instances of TWS (paper + real) on the same ubuntu box, then you’ll need to login into both accounts and set up “Socket port” on two different port numbers, for example, 1234 for paper and 1235 for real accounts.
Configure IBC
Edit twsstart.sh
After you copied unzipped “IBCLinux-3.8.1.zip” to 2 folders: “/home/ubuntu/ibc.paper” and “/home/ubuntu/ibc.real” you’ll find “userguide.pdf” inside each of those folders, which is MUST read before any post(s) that something is not working. Unzip it on your local PC and use any PDF viewer to carefully read it.
Pay attention to the following 2 scripts:
cd /home/ubuntu/ibc.paper
ls -1 *.sh
gatewaystart.sh
twsstart.sh
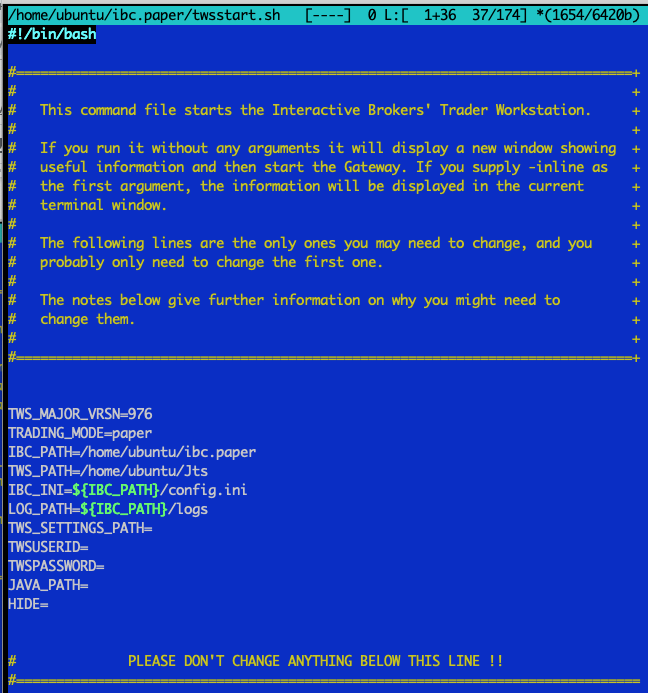
Choose one depending on whether you use TWS or Gateway. In our case we'll proceed with /home/ubuntu/ibc.paper/twsstart.sh and here's its content after edit (note: lines order slightly changes to re-use $IBC_PATH without re-typing it many times.. Might save us from troubles during an upgrade to the next version):
Here’s the same content, but copy-n-pastable:
|
TWS_MAJOR_VRSN=976 TRADING_MODE=paper IBC_PATH=/home/ubuntu/ibc.paper TWS_PATH=/home/ubuntu/Jts IBC_INI=${IBC_PATH}/config.ini LOG_PATH=${IBC_PATH}/logs TWS_SETTINGS_PATH= TWSUSERID= TWSPASSWORD= JAVA_PATH= HIDE= |
Similarly, edit the script for real account: /home/ubuntu/ibc.real/twsstart.sh
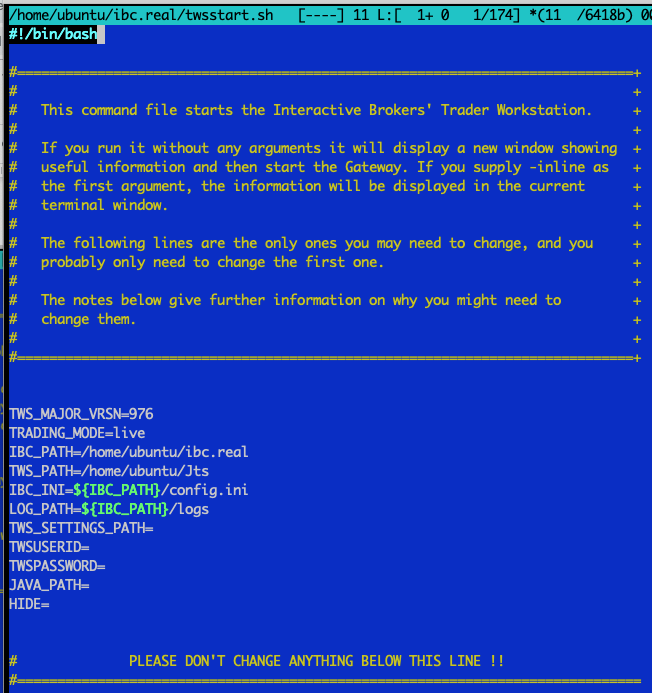
Similarly edit /home/ubuntu/ibc.real/twsstart.sh file. Here's the copy-pastable text for "real" account:
|
TWS_MAJOR_VRSN=976 TRADING_MODE=live IBC_PATH=/home/ubuntu/ibc.real TWS_PATH=/home/ubuntu/Jts IBC_INI=${IBC_PATH}/config.ini LOG_PATH=${IBC_PATH}/logs TWS_SETTINGS_PATH= TWSUSERID= TWSPASSWORD= JAVA_PATH= HIDE= |
Edit IBC config.ini
Time to edit our friend "/home/ubuntu/ibc.paper/config.ini" file.
Remove windows line-endings, create a backup of the original ini file (it will hold all the comments) and remove all comments and empty lines from our working copy of ini file, so it fits 1 screen:
sudo apt -y install dos2unix
cd /home/ubuntu/ibc.paper/
dos2unix *ini
cp config.ini config.ini-original
cat config.ini-original | grep -ve '^#' | grep -ve '^$' > config.ini
The final edited /home/ubuntu/ibc.paper/config.ini file looks like this:
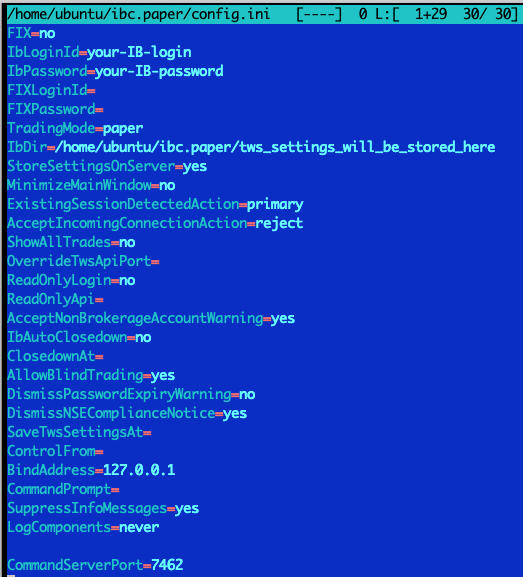
Note: "CommandServerPort" (see the last line) added in the end (by default it is commented out). We will enable port 7462 for real account and 7463 for paper. It would allow us to stop TWS instances by simply sending "STOP" command to IBC control port (will be covered below).
Note (from October 10th, 2018): according to this discussion on TWS API group: View/Reply Online (#40860):
[IBC users please note that setting ‘ExistingSessionDetectedAction=primary’ in your config.ini should cause the Re-Login dialogue to be handled automatically.]
(end of quote)
Make sure that previously started TWS is no longer running. You should stop it via VNC if it is running.
Note IbDir value – we need to set it since we want 2 instances of TWS’es to store their settings in different folders from the one it’s installed in (to avoid overlap).
Let's create those 2 custom folders:
mkdir /home/ubuntu/ibc.paper/tws_settings_will_be_stored_here
mkdir /home/ubuntu/ibc.real/tws_settings_will_be_stored_here
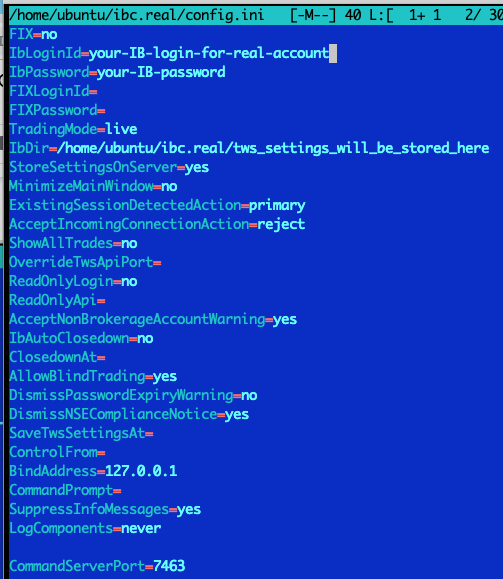
Now edit real account configuration /home/ubuntu/ibc.real/config.ini similarly to “paper” one.
Hint: after you edited your “paper” config.ini you can use that file as a starting point for your “real” config.ini:
cp ~/ibc.paper/config.ini ~/ibc.real/
Then edit /home/ubuntu/ibc.real/config.ini
Make sure you use different CommandServerPort values for paper and real config.ini files.
For example 7462 for paper and 7463 for real IBC values will do.
Also modify your IbLoginId and IbPassword for real account and
IbDir=/home/ubuntu/ibc.real/tws_settings_will_be_stored_here
Example of “real account” /home/ubuntu/ibc.real/config.ini file:
Time to try to start both IBC!
Let's double check that all .sh files can be executed by owner:
cd ~/ibc.paper
chmod u+x *.sh
chmod u+x scripts/*.sh
DISPLAY=:0 ./twsstart.sh
Same for real account:
cd ~/ibc.real
chmod u+x *.sh
chmod u+x scripts/*.sh
DISPLAY=:0 ./twsstart.sh
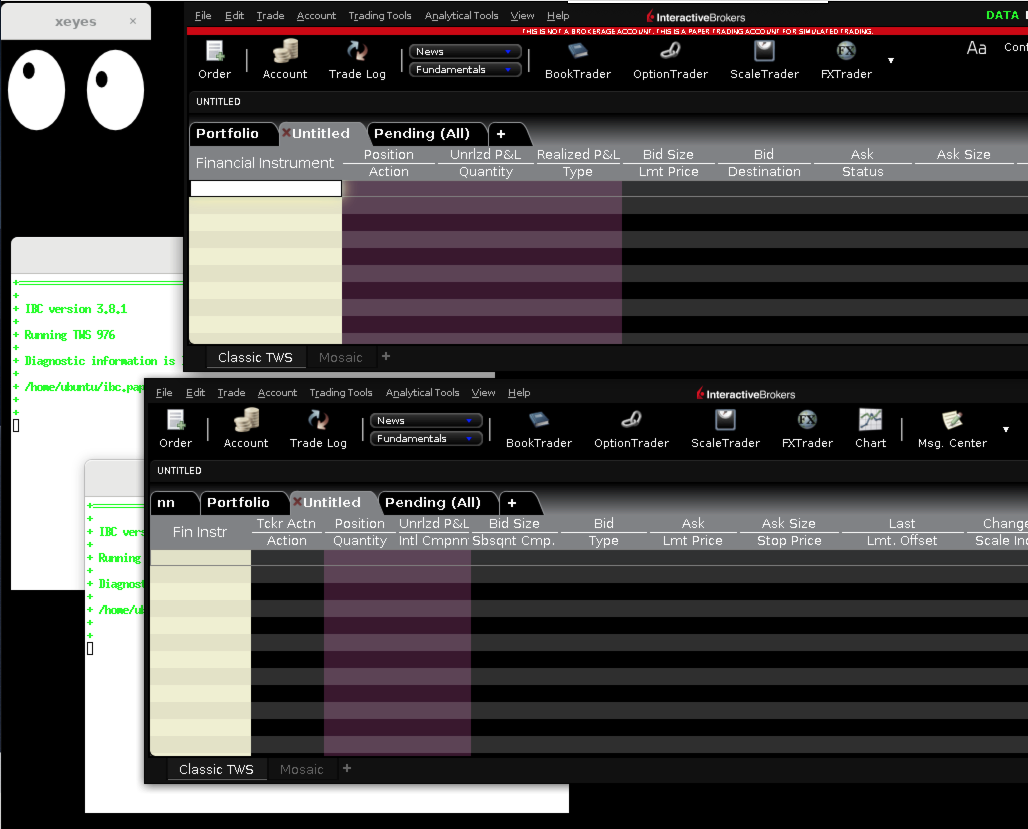
Check if all went as expected and looks good! Take a look at these 2 beauties:
If you accidentally started 2 instances of real account and they endlessly compete over each other and you can’t interact with them via VNC (via GUI), then simply kill all java processes on the box from command line:
killall java
Let us check listening ports by java processes:
sudo netstat -nap | grep java
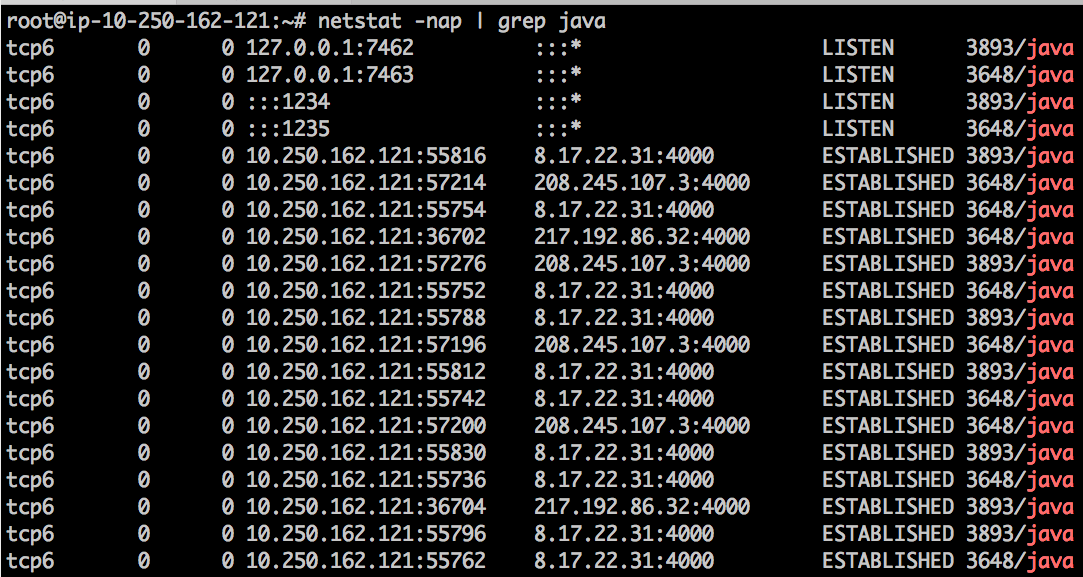
As you can see two separate TWS/IBC processes are exposing API on ports :1234 and :1235 (your trading app will connect to these ports) as well as waiting for IBC-commands on ports :7462, :7463. Also, you can see a bunch of already ESTABLISHED connections to IB’s farms (to remote broker’s port :4000)
Are we done yet? No, not quite. There are couple of unsolved things on the table:
- We’d secure our Ubuntu box a bit
- Startup should be less manual (we don’t want ssh int the box every day)
Secure our ubuntu box a bit
secure box: install fail2ban
This simple utility will ban all bad guys who's trying to bruteforce ssh on your box. Here's fail2ban wiki. Easy to install and "just works" out of the box (will start itself right after installation and will keep auto starting on ubuntu startup):
sudo apt install -y fail2ban
All the configuration for fail2ban can be found under "/etc/fail2ban", but you don't have to change anything there unless you want to harden ban time (see Fail2ban Server Hardening for example).
You don't need to keep an eye on fail2ban, but if you're curious you can always check the current status by the following commands:
fail2ban-client status
fail2ban-client status ssh
Example status outputs:
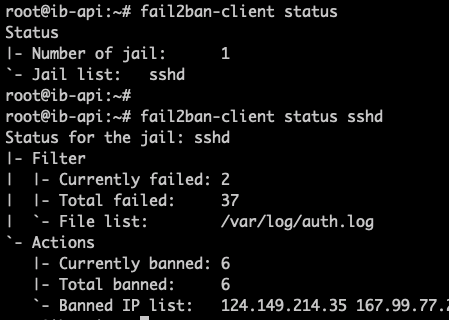
For advanced users: you can even customize fail2ban to watch any custom logs (for example log of your app or TWS log) and ban IP addresses which generate certain log line (matched by regex patterns).
secure box: next steps
As we saw on the previous screenshot (port wise) IBC properly bind to 127.0.0.1, which means it is not accessible from outside (from public Internet), so no need to worry about it, but API ports (:1234 and :1235) are visible from outside.
There are few options to protect them:
secure box: option #1: Leave “as is”
We can choose to solely rely on TWS “Trusted IPs” setting.
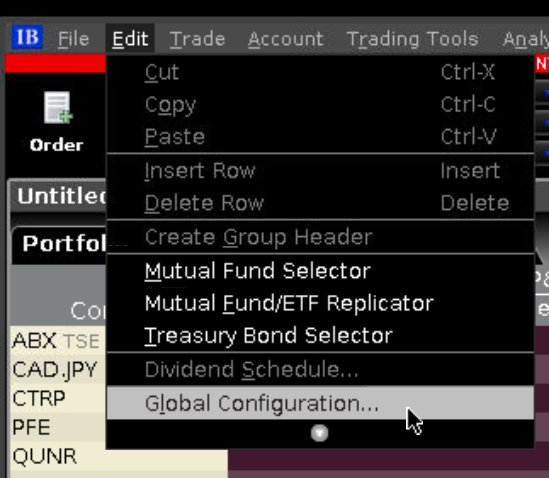
Simple! And probably acceptable by many. The only disadvantage – all those nasty net crawlers will periodically connect to your port to sniff it. It is harmless until they’re not DoS’ing / hacking your port (with thousand connections per second over and over or using some exploit), which then might affect your operations. Another risk here is the “AcceptIncomingConnectionAction=accept” setting in config.ini – this one would allow anybody to send any API calls to your box! As IBC userguide.pdf suggests: “It is safest to set this to reject and to explicitly configure TWS to specify which IP addresses are allowed to connect to the API”. If you know source IP of your client app (one that connects to TWS ports :1234 and/or :1235), then change AcceptIncomingConnectionAction=accept to AcceptIncomingConnectionAction=reject and add trusted IP(s) into TWS configuration: TWS app -> menu -> Edit -> Global configuration… -> API -> Settings -> Trusted IPs list (use "Create" button to add more IPs).
secure box: option #2: By firewall rules: Only allow connections from known IP / range of IPs
See accepted answer on this stackoverflow on how to create iptables rules on range of IP’s
secure box: option #3: Firewall: Only allow local connections
First, we will block incoming connections from internet by firewall rules and then only allow connections from loopback interface:
Secure port :1234 to accept only local connections:
iptables -I INPUT -i eth0 -p tcp –dport 1234 -s 0.0.0.0/0 -j DROP
iptables -I INPUT -i lo -p tcp –dport 1234 -j ACCEPT
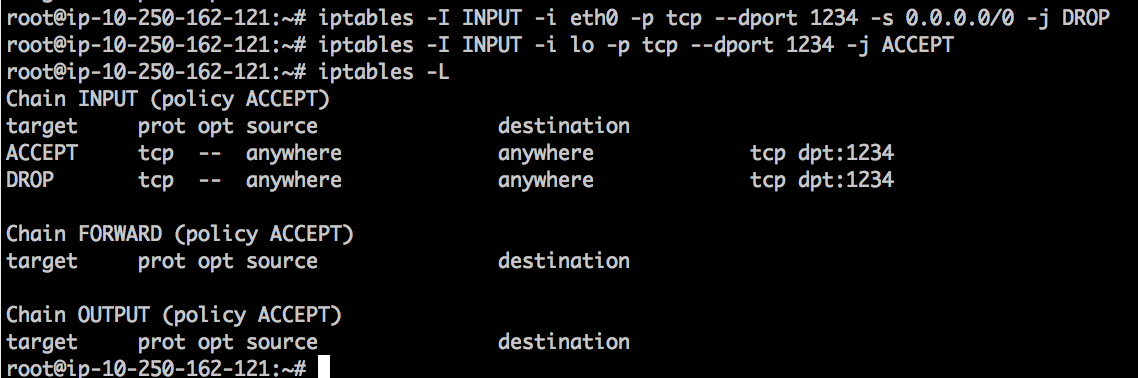
Then do the same for port :1235.
Now as the rules are in place let us try to telnet to the box using public IP (will timeout) and then using local interface (will succeed):
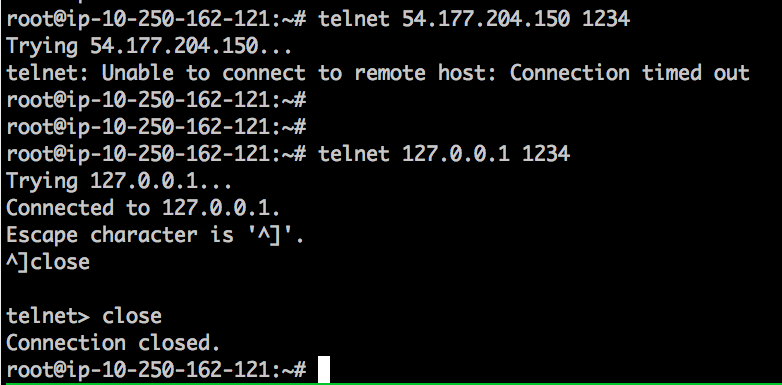
All we need now is to deploy our API client on the same box and it will successfully connect to both 127.0.0.1:1234 and 127.0.0.1:1235 while the rest of the world won't be able to! Note: iptable rules will disappear after reboot, so search on how to make those persistent, for example link: Persistent Iptables Rules in Ubuntu 16.04
secure box: paranoia-to-the-max option: client use ssh-tunnel to access TWS API
“if you don't have paranoia it doesn’t mean no one is watching you…”

This is my preferred way. We block all inbound ports except ssh (port 22) and access API ports remotely via ssh tunnel or simply run our trading app on the same box. SSH tunnel can be defined by your local (on your laptop) config file, so to establish the tunnel all you need is to open terminal and ssh into the remote ubuntu.
Advantages:
- remote client with random IP will be able to connect to TWS API port!
- all communication is encrypted
- no need to expose anything but ssh port :22 to outside world
So again, we secure port :1234 to accept only local connections:
iptables -I INPUT -i eth0 -p tcp –dport 1234 -s 0.0.0.0/0 -j DROP
iptables -I INPUT -i lo -p tcp –dport 1234 -j ACCEPT
Same for port :1235
iptables -I INPUT -i eth0 -p tcp –dport 1235 -s 0.0.0.0/0 -j DROP
iptables -I INPUT -i lo -p tcp –dport 1235 -j ACCEPT
In case your API client is on some remote host (say laptop) with ever-changing public IP (your developers are traveling or your ISP change your public IP quite often and you don’t want to use/pay for services like DynDNS), then you’ll need to build a ssh tunnel from your “on-the-go-random-IP” API client host to your Ubuntu box “server”. A client will have to know the public IP address of the ubuntu "server" box hosting your IBC/TWS processes.
Client open ssh tunnel to remote 54.177.204.150
ssh -i ~/.ssh/my-magic-key.pem -N -L 1111:127.0.0.1:1234 ubuntu@55.17.24.150
Hint: instead of providing you ssh key with “-i” option, you can set up “ssh agent” and give him your key once only, so all future ssh from your laptop to the remote box will be passwordless (for you only)
Now you can connect to ‘localhost:1111’ as if TWS is running locally on your laptop and TWS API socket is waiting for incoming connections on the local port 1111. For more about tunnel read: [Q] How to automatically accept client connections to TWS and/or Gateway from any remote IP address (not known in advance)?
Here is an example of ssh config on my laptop, which establishes port forwarding for VNC (see port 5900 forwarded) as well as ports 1234 and 1235 automagically as soon as I open ssh settion to my remote box by "ssh 1.2.3.4" command and keep terminal with ssh session open/running.
cat ~/.ssh/config
Host 1.2.3.4
ForwardAgent yes
User ubuntu
LocalForward 5900 127.0.0.1:5900
LocalForward 1234 127.0.0.1:1234
LocalForward 1235 127.0.0.1:1235
Make it all startup on boot!
We want ubuntu box to take care of all the parts of our equation and start them in proper sequence on boot as well as restart any of suddenly stopped processes.
Ubuntu 18.04 uses systemd (they give up using upstart around version 14.04):
– For those who got used to upstart and want to move to systemd
– And here's the systemd documentation
– Few more pages on how to create systemd dependencies between your services
– For "Restart=always" (to keep IBC restarting if it exits for some reason): link
Let’s create 4 services systemd-style:
Create file /lib/systemd/system/xvfb.service with the following content (you’ll need to use sudo to create/edit this system file):
|
[Unit] Description=Job that runs the Xvfb – Virtual Framebuffer 'fake' X server After=network.target
[Service] ExecStart=/usr/bin/Xvfb :0 -ac -screen 0 2048x1536x24 Restart=always
[Install] WantedBy=multi-user.target
# this file came from: https://dimon.ca/how-to-setup-ibc-and-tws-on-headless-ubuntu-in-10-minutes/ # also see (for "templatized approach"): # http://superuser.com/questions/319040/proper-way-to-start-xvfb-on-startup-on-centos/912648#912648 |
Create file /lib/systemd/system/vnc.service with the following content (change 2 passwords highlighted in red):
|
[Unit] Description=Job that runs the VNC server to allow remote access to an existing X session Requires=xvfb.service After=xvfb.service
[Service] Type=forking Environment='READONLY_PASSWORD=readonly_pass123' 'FULLACCESS_PASSWORD=fullaccess_pass123' ExecStart=/usr/bin/x11vnc -ncache 10 -ncache_cr -viewpasswd ${READONLY_PASSWORD} -passwd ${FULLACCESS_PASSWORD} -display :0 -forever -shared -logappend /var/log/x11vnc.log -bg -noipv6 Restart=always
[Install] WantedBy=multi-user.target
# this file came from: https://dimon.ca/how-to-setup-ibc-and-tws-on-headless-ubuntu-in-10-minutes/ |
Create file /lib/systemd/system/ibc-paper.service with the following content:
|
[Unit] Description=Job that runs the IBC for paper account Requires=xvfb.service After=xvfb.service
[Service] Type=forking Environment='DISPLAY=:0' ExecStart=/home/ubuntu/ibc.paper/twsstart.sh Restart=always
[Install] WantedBy=multi-user.target
# this file came from: https://dimon.ca/how-to-setup-ibc-and-tws-on-headless-ubuntu-in-10-minutes/ |
Create file /lib/systemd/system/ibc-real.service with the following content:
|
[Unit] Description=Job that runs the IBC for real account Requires=xvfb.service After=xvfb.service
[Service] Type=forking Environment='DISPLAY=:0' ExecStart=/home/ubuntu/ibc.real/twsstart.sh Restart=always
[Install] WantedBy=multi-user.target
# this file came from: https://dimon.ca/how-to-setup-ibc-and-tws-on-headless-ubuntu-in-10-minutes/ |
systemd Ignores invalid directives, so we have to carefully check created
service file for typos and/or badly formatted options:
Check real-account service:
sudo systemd-analyze verify ibc-real.service
echo $?
Hint: the “$?” bash variable gives us exit code of the previously run command
Expected output "0" (zero) means there were no errors found by the verification process.
Note: "systemd-analyze" can give the following error: "Attempted to remove disk file system, and we can't allow that.", which is a well known bug of systemd and hopefully will soon be resolved. It boils down that systemd can't delete some of it tmp files during cleanup phase and does not interfere with our goals here (see this StackExchange article for details).
Similarly, check the paper-account service:
sudo systemd-analyze verify ibc-paper.service
echo $?
No errors! Good! (do the same check for all 4 new services)
Set all the services we created to auto-start on bootstrap and reboot the box:
sudo systemctl enable vnc.service
sudo systemctl enable xvfb.service
sudo systemctl enable ibc-real.service
sudo systemctl enable ibc-paper.service
sudo reboot
Example output:

Now we rebooted the box and voila! We have both TWS running. VNC is there!
You can leave this box running forever (well, at least until the next major release which will force you to upgrade or Armageddon). TWS will be restarted once a day (see How to restart TWS once a day?). Now you can concentrate on your trading app!
Crash-Test Time!

Let's see if systemd will actually restart TWS for us when we emulate “sudden app crash” by closing it. We will directly send “STOP” command to the IBC. Or better even stop both TWS’es:
And then both TWS are back in seconds! To actually stop those (if needed) you’ll now do it via systemd command:
sudo systemctl stop ibc-real.service
sudo systemctl stop ibc-paper.service
If you want to disable start “on boot” for both TWS, then just:
sudo systemctl disable ibc-real.service
sudo systemctl disable ibc-paper.service
You can also try to “kill -9” the frame buffer (xvfb), which will consequently crash both TWS’es and systemd will restore those apps in proper order. How nice is that!?!!
Add custom ibcstop.sh script
And here's the content of /home/ubuntu/ibcstop.sh script, which takes as the only argument integer value of port (cofigured as "CommandServerPort") earlier, and script sends "STOP" command to that command port, which tells IBC to shutdown TWS and itself. Note: if you configured ibc service to self-restart, then stopping IBC will end up with restarting it again 🙂
——————- ibcstop.sh (option 1) — (begin) ———
#!/bin/bash
# ibcstop.sh exit with code 0 on success, or code 1 otherwise
# Usage example:
# ./ibcstop.sh 7462
# IP and PORT that IBC listens on for commands such as "STOP"
PORT=$1
# Note: by default IBC bind to public i-face, not 127.0.0.1
IP=127.0.0.1
# Number of attempts to try
ATTEMPTS=3
# Timeout (in seconds) to wait for IBC response
TIMEOUT_S=10
EXPECTED_REPLY="OK Shutting down"
# ——- do not edit after this line —————————
if [ "$PORT" == "" ]; then
echo "error: please specify the port to communicate with IBC (default 7462)." >&2
exit 1
fi
for itry in `seq 1 ${ATTEMPTS}`; do
# send STOP command
OUTPUT=`{ sleep 5; echo "STOP"; } | nc -w ${TIMEOUT_S} ${IP} ${PORT}`
echo "debug: OUTPUT: ${OUTPUT}"
# You can even do case-insensitive substring matching natively in bash
# using the regex operator =~ if you set the nocasematch shell option.
# shopt -s nocasematch
# check if got expected output
if [[ "${OUTPUT}" =~ "${EXPECTED_REPLY}" ]]; then
echo ${OUTPUT}
# exit with success code (zero)
exit 0
fi
done
echo "error: failed to shut down after ${ATTEMPTS} attempt(s)"
exit 1
——————- ibcstop.sh (option 1) — (end) ———
Don't forget to make script executable by user:
chmod u+x /home/ubuntu/ibcstop.sh
The much simpler alternative to ibcstop.sh, which I didn't like, but will include here for completeness (imho was/is included in the IBC project? can't check right now) is:
——————- ibcstop-simpler-alternative.sh (option 2) — (begin) ———
#!/bin/bash
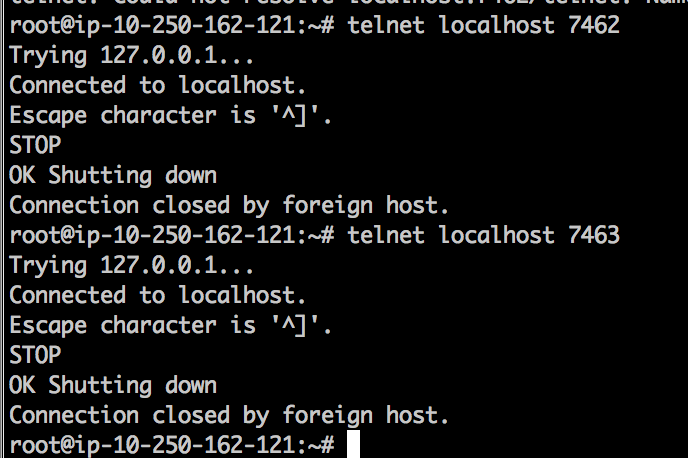
{ sleep 2; echo "STOP"; } | telnet 127.0.0.1 7463
exit 0
——————- ibcstop-simpler-alternative.sh (option 2) — (end) ———
The above "daily restart" approach works for me fine. If you shutting down your EC2 box overnight then you can either use only "shutting down" portion of the above "solution" or you can move crontab start time close to the market open hours and then you'll only need to not forget to start your EC2 box earlier that day!
You can even notify yourself by email if instance started or not by +1 more line in crontab around +4 minutes since start command, but it is a completely separate topic:)
How to restart TWS once a day?
While there is a new feature in IBC config.ini "ClosedownAt=". I prefer to restart TWS by sending "STOP" command to IBC "CommandServerPort" every day from crontab. Let's simply use previously configured custom "ibcstop.sh" script to stop both paper and real IBC+TWS'es once a day. You must be root user to edit /etc/crontab. Copy these lines into your /etc/crontab:
——————- copy this to /etc/crontab — (begin) ———
# every 4:16 am UTC (about 00:16 or 01:16 eastern, depending on the daylight
# saving time in effect) stop both real and paper TWS'es
16 04 * * * root /home/ubuntu/ibcstop.sh 7462
16 04 * * * root /home/ubuntu/ibcstop.sh 7463
——————- copy this to /etc/crontab — (end) ———
And that's it! For debugging process just change the crontab to +3 minutes from your current time and save the file and check what will happen (or not happen:) in +3 minutes from now. If all configured good, then you'll see both IBC+TWS'es were restarted around expected time. Then set time back to the proper time. And we're done!
Alternative lower level IBC+TWS restart (if you haven't registered them as self-starting services)?
If you for some reason didn't trust Ubuntu to self-start the whole chain of programs automatically on boot (as ubuntu services orchestrated by systemd) and wish to run those manually only when needed, then it will be your responsibility to fully stop and start whole stack once in a while. In the following example let's schedule daily restart (normally done around IB's maintenance hours, right after midnight eastern time).
Copy these lines into /etc/crontab file to stop and start IBC automagically once a day (note: use "sudo" to get root-user privileges to edit /etc/crontab file):
——————- copy this to /etc/crontab — (begin) ———
# every 4:16 am UTC (about 00:16 or 01:16 eastern, depending on the daylight
# saving time in effect) stop both real and paper TWS'es
16 04 * * * root /home/ubuntu/ibcstop.sh 7462
16 04 * * * root /home/ubuntu/ibcstop.sh 7463
# Just a precocious measure: in +1 minute kill all leftovers (if ibcstop.sh fail to
# stop TWS, then this one will kill IBC + TWS processes (4 if real+paper running))
17 04 * * * root for i in `ps aux | grep java | grep ibc | awk '{print $2}'`; do kill -9 $i; done
# in +3 minutes then start 2 TWS'es (takes about 1.5minutes)
18 04 * * * ubuntu cd /home/ubuntu/ibc.paper && DISPLAY=:0 ./twsstart.sh
18 04 * * * ubuntu cd /home/ubuntu/ibc.real && DISPLAY=:0 ./twsstart.sh
——————- copy this to /etc/crontab — (end) ———
Almost useless appendix
Note #1: Fine tunning ssh config (to automate port forwards)
To secure your box you'd allow inbound only SSH port 22 and that alone will allow you to do whatever you need via the tunnel(s).
Having the only inbound port 22 (for ssh) allowed is enough for everything to work.
As for "outbound" – there's no need to add any restrictions. I usually have it "all allowed" for both IPv4 and IPv6 like this:
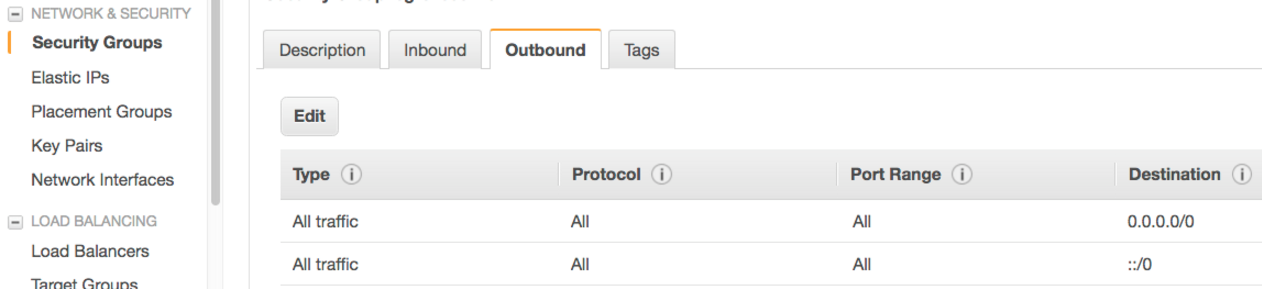
and then you don't have to know which ports TWS/GW require to be open. Any connection initiated from your box to outside world will succeed.
I can also show how to make required port forwarded each time when you ssh to the remote box, so you don't have to run separate tunnel commands and/or have to run several ssh tunnel commands if you need more than one port forwarded!
Check my local ssh config file (on my laptop):
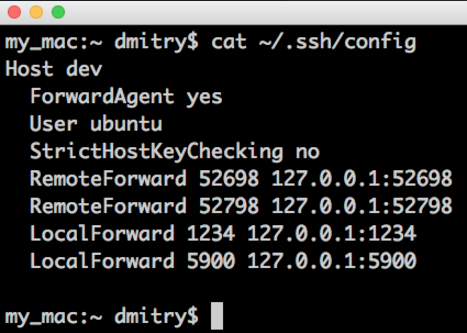
now I "ssh dev" and let's see what ports are listening on my local mac and remote linux box after that "the only" ssh session is open:
1) on remote box 2 ports "RemoteForward'ed" back to my mac (you don't need it.. I use it only to run local to my mac "Visual Studio Code" editor to edit remote files (very convenient, but separate topic:)):

2) on local mac:

As you can see we have multiple ports forwarded from mac to remote and multiple ports forwarded in other direction.
All of those are working great via the only open ssh session initiated from my mac to remote Amazon box by simply ssh'ing into that box!
Instead of “Host dev” you can specify your host by IP, like: “Host 1.2.3.4”, also you can have multiple host sections defined, or you can even have a section “Host *” and then it will be applied to ANY host you connect to via ssh. Google for “ssh config file” and read more.
Note #2: There’s NO need to install Java (OpenJDK 8). It can be even harmful!
There is NO NEED to install java manually! It can even be harmful as noted by Richard L King:
(quote – message from Richard L King)
I noticed a section on installing OpenJDK 8, which concerns me for two reasons:
1. For TWS versions starting at 952, you don’t need to have any Java installed: a ‘hidden’ Oracle Java installation is included in the installation files (this is good because you can expect that TWS/Gateway will work with this Java since it’s presumably the one that IB tested them with). It also means that the user doesn’t have to worry about installing Java and keeping it up-to-date etc.
2. In my experience, TWS doesn’t actually work with OpenJDK, only with Oracle Java. It looks like it’s started up ok, but it never actually gets to the point where you can do anything with it. For example, the clock never starts ticking and it never responds to mouse clicks. However, my testing was on Ubuntu 15.10 and I’m only just now updating to 16.04, so it’s possible the latest OpenJDK version fixes these problems. I’ll check it out later today.
Richard
(end of quote)
Richard, you’re absolutely right!
There's NO need to install JavaSDK. I've removed this section from the doc!! (well, I moved it down to Appendix section along with your comments as it might be still good exercise to try someday if all works good with JDK 8)
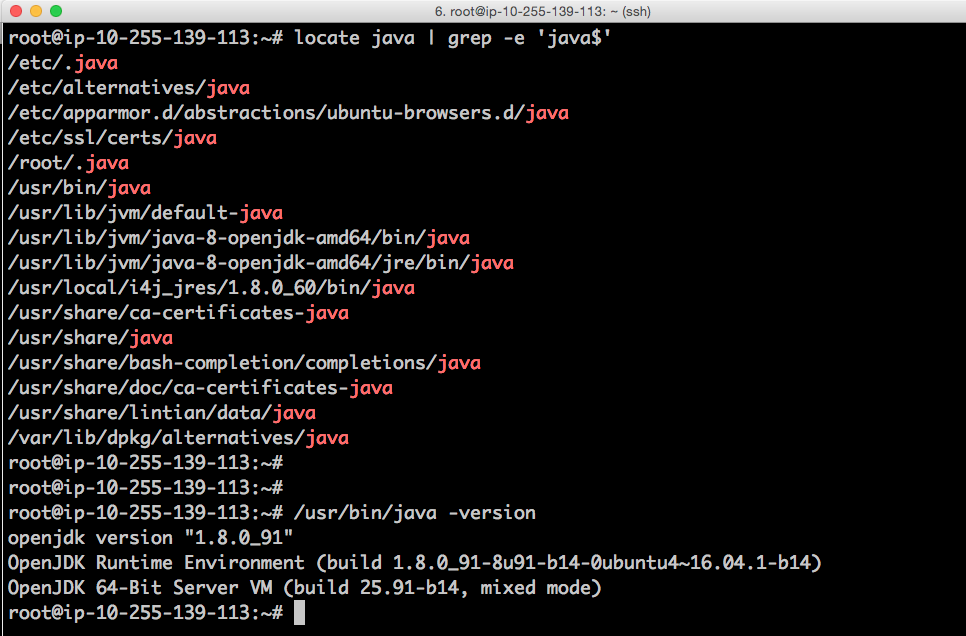
Here's the java version which Ubuntu16.04 ended up with after TWS installer finished:
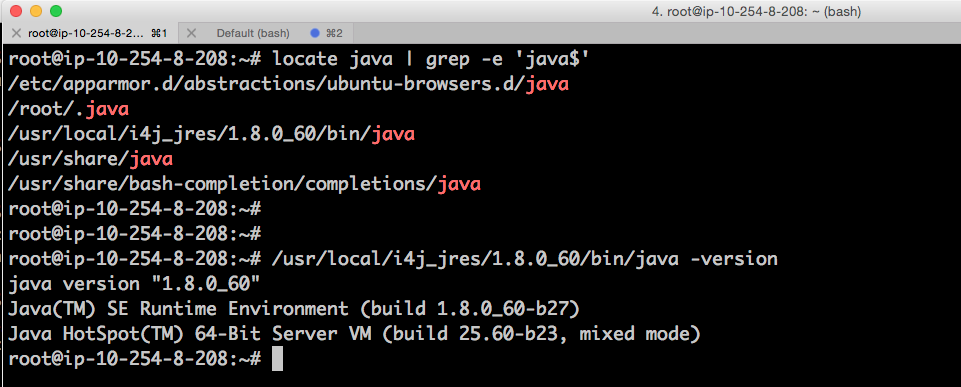
Let us compare with what was installed on other box (where I manually installed JDK 8):
But if you still want to experiment with manual install of the latest Java
But if you still want to experiment with manual install of the latest Java (suggested by aptitude for this particular Ubuntu version) then here you go:
# ssh into the box and become proper root:
sudo su -l
# update/upgrade ubuntu:
apt update
apt upgrade
# install java as per this article
apt install default-jdk
(this will install OpenJDK 8)

# Setting the JAVA_HOME Environment Variable (by same article)
# check path to your java:
update-alternatives –config java
# edit /etc/environment
nano /etc/environment
# add following line:
JAVA_HOME="/usr/lib/jvm/java-8-oracle"

# reload environment
source /etc/environment
Some useful systemd commands
(Quote from aksubuntu: Command to list all services)
Find some information on systemd services
To find out all services that have been run at startup:
systemctl list-units –type service
this will show all services that has been loaded at boot and are active now. If you want to get a list of all services no matter they are active or not:
systemctl list-units –type service –all
Another thing you can do is to run:
systemctl list-dependencies –type service
then hit / and search for mongodb see what service/target depends on it and runs it.
Also you can run :
locate mongodb.service
Which produces something like:
/lib/systemd/system/multi-user.target.wants/mongodb.service
then you will know that it's being started as a part of multi-user target, alternative to this is:
$ systemctl cat mongodb.service | grep -i wantedby WantedBy=multi-user.target
Disable it
To find out that if it's active (Will be run at startup/boot-time):
systemctl is-active mongodb
It's either active or inactive; In your case it should be active.
To stop it from being started at boot time we should disable it:
sudo systemctl disable mongodb
And to make sure nothing else (No other service) can start it, we mask it:
systemctl mask mongodb
so it will be linked to /dev/null and can't be started automatically or manually anymore.
(end of quote from aksubuntu: Command to list all services)
[Q] Home-based installation of Ubuntu 18.04 hangs for a minute with message "a start job is running for wait for network to be configured" upon boot.
[A] To defeat this nasty behavour:
|
read and |
|
Use systemctl disable systemd-networkd-wait-online.service to disable the wait-online service to prevent the system from waiting on a network connection, and use systemctl mask systemd-networkd-wait-online.service to prevent the service from starting if requested by another service (the service is symlinked to /dev/null). |