Trader's notes: How to build own Stratum-1 NTP server on Raspberry-Pi + GPS (PPS)
for trading from home
Theory is great in theory, but in practice,
practice is better. (c) "zmq The Guide"
This document describes the steps I took to patch/compile own Linux kernel for Raspberry Pi for NTP+PPS support. It is just a compilation of the following respectful sources (99% of the content is copy-n-paste):
1) Raspberry Pi Stratum 1 NTP server with PPS Accurate timekeeping at low cost
http://ntpi.openchaos.org/pps_pi/
2) Raspberry Flavored Time (a NTP Server on Your Pi, Tethered to a GPS Unit)
http://open.konspyre.org/blog/2012/10/18/raspberry-pi-time-server/
3) The Raspberry Pi as a Stratum-1 NTP Server
http://www.satsignal.eu/ntp/Raspberry-Pi-NTP.html
4) RPi Kernel Compilation
http://elinux.org/RPi_Kernel_Compilation
They all are great and they all add few missing pieces to the puzzle, but none of them was self-sufficient to accomplish the task.
This doc logs all the ‘a’ to ‘z’ steps to build “The Thing” in one place!-)
Table of contents:
Why!? Why on Earth would I want to compile own freaking linux kernel for R-Pi ever!?
(Optional) Power over Ethernet (PoE)
1st attempt: Raspberry Flavored Time (pre-compiled kernel and modules) – skip this
Build a cross compiler for your Raspberry Pi
Now give your cross-compiler a quick sanity check
Raspberry Pi Stratum 1 NTP server with PPS (customize your kernel)
1) on the cross compile host do all as ‘pi’ user
3) set an environment variables
4) switch to desired version of kernel
5) clean the kernel source with "make mrproper"
6) Pull the /proc/config.gz from the running Raspbian 3.10 installation
7) Prime kernel with the old config by running: make oldconfig
7a) Use menu to build final .config:
7b) Some of Failed Config attempts (ignore it, it is just for the record here)
8) Patch the kernel to support GPIO pin 23
10) Install modules to some tmp folder (later we’ll pass’em to R-Pi)
11) convert compiled kernel into kernel.img
12) zip and upload to raspberry pi
Download and Install OS RASPBIAN Debian Wheezy
Go through initial setup (starts automatically on boot)
Update and few dependencies install
Load the pps-gpio module at startup
Update the Raspberry Pi firmware
Automatically Making Links In /etc/udev
Installing and Configuring NTP
Unit Calibration (skip if not using Adafruit’s GPS module)
Few screenshots when everything is working ok
First: minimal install – note mem usage and load
2nd set of screenshots after couple days of running with all extra (monitoring) pieces installed
Apache + Munin (with NTP module enabled)
Replace Apache server with Nginx (to fully support munin cgi scirpts)
Setting Up munin on Ubuntu Server 13.04 with nginx
An aside – what is a module in Linux?

Why!? Why on Earth would I want to compile own freaking linux kernel for R-Pi ever!?
When I started analyzing different kinds of tick data which I’m subscribed to via API (Interactive Brokers) I noticed that my Win7Pro (CPU: i7, RAM: 16G, endless hdd:) have nasty time drift (about 0.2 seconds or more each 4 hours). Even though I synchronized my windows local clock once a day it got about 2 seconds error within next 24 hours! It was not acceptable. Then after googling around I found Meinberg NTP port to windows as a perfect implementation of popular in unix world NTP server implementation ported into the windows universe. I’m strongly recommend to install it to all windows (and unix of course already has ntpd:) users even if you are not going to build you own Stratum-1 NTP toy. The only problem here is that your local time error is still drifting about 5-20 millisec (due to network jitter and time quality of servers you’re connected to – usually they will be stratum-2 and stratum-3). If that is ok with you, then you don’t need to have your own NTP on your LAN. If you want to narrow down time error to plus-minus 2.5 milliseconds then you’d have to build local NTP Stratum-1 guy!-)
Actually there is another problem when using public NTP servers – they have quite strict policies (especially busy high-precision stratum-1 ones), for example:
(quote from stratum1 policy)
Each of your hosts should not run its own NTP server. Hosts should only query an NTP server once a day. When used NTP will typically adjust your systems clock by a very small amount (often less than a second) to compensate for drift.
(end of quote)
Once per day?! I’ve been there.. : ) it is not an option! Right now all my LAN hosts are pulling from my NTP stratum 1 server each 8 seconds and it can handle >500 requests per second without any policy abuse complains : ))
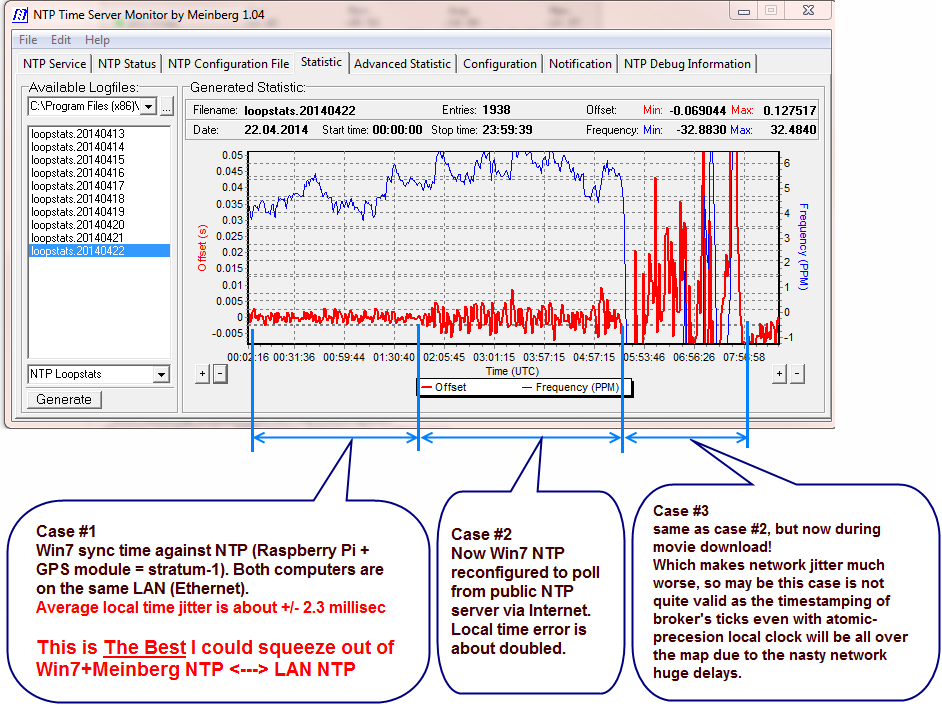
Let us compare 3 cases:
Case #1: During couple hours windows box is polling NTP updates each 8 seconds from local (same LAN) NTP server, which has about 3.5 microsec. time jitter.
Case #2: same box, but now polling data only from public NTP servers.
Case #3: same as #2, but lots of traffic flying by (2 hours movie download:)
As you can see the best I could do was +/- 2.3 millisec (case #1), which is much worse than I’d expect to lose in precision when coming from Stratum N level to Stratum N+1. In above case we loose about 3 orders of magnitude (2.5 microsec for NTP server turns into 2.3 millisec on lan connected windows box). But here’s a quote:
(quote)
There are several articles on NTP accuracy. The best of them seems to be one by Dave Mills (the primary investigator on NTP). NTP v4 with kernel mods to support it, is capable of much better than 1ms accuracy, possibly as good as 1ns. According to his article, NTP v3 is accurate to 1-2ms in a LAN and 10s of ms in WAN nets.http://www.cis.udel.edu/~mills/ntp.html
(end of quote)
seems the results on the screenshot above are in-line with author of NTP himself (Dave Mills), so lets consider this settled – bottom reached!-)
ps: the only way to further improve Win7 box time precision is probably to convert the box into NTP server itself, add GPS PPS impulses on serial port, then we’d have sync “polls” every second, but I’m not going to implement this. +/- 2.5 millisec is good enough considering we might have network jitter (to our broker) 1 order of magnitude bigger.

General roadmap
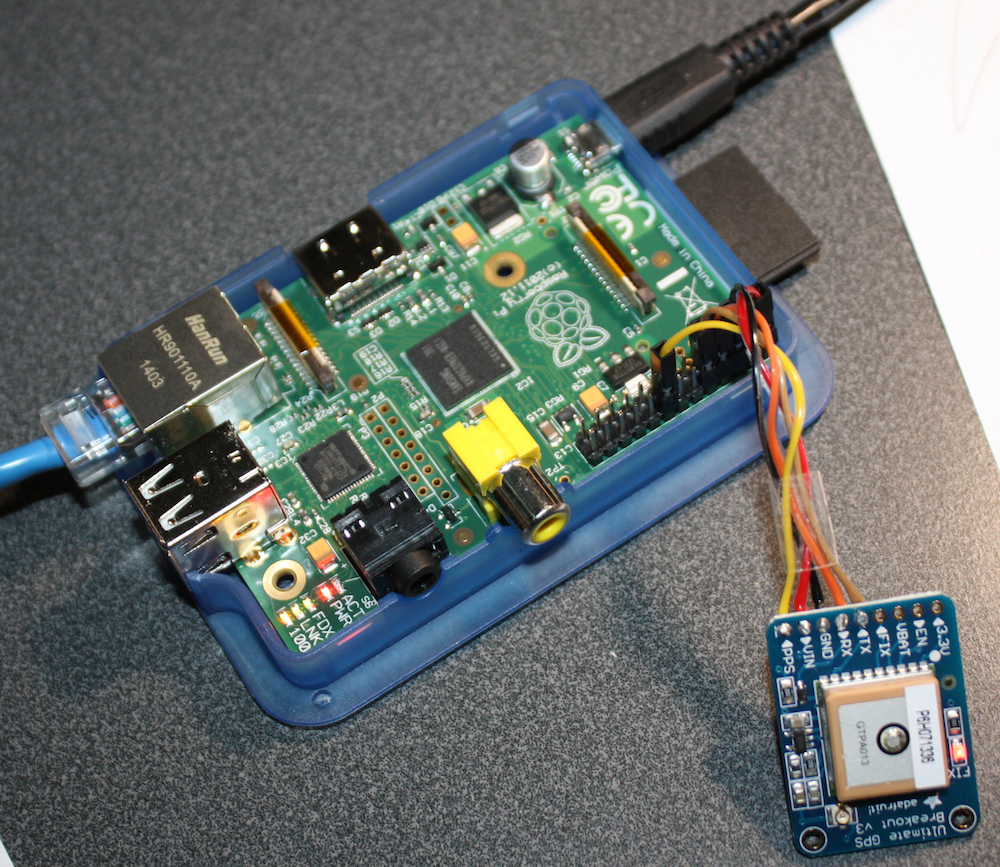
After “Adafruit Ultimate GPS Breakout” was hooked up to GPIO pins on the R-Pi there were few options to choose from to make own Stratum-1 NTP server. One option was to run without kernel modifications (in user space: more details), but in this case instead of expected “less than 4 microsec” precision on your NTP R-Pi server you can “only” expect it to be around 30-40 microsec. Not cool 🙂
Now if we look at the “let kernel do this for us” ways – again we have a few options down there:
– use pre-compiled binaries provided by 3rd party
– use own compiled shiny brand new kernel of version of your choice plus heck load of modules and the way to compile them (as part of the kernel or bootable module (when you can specify even some module parameters when you load the module)) all this is at your fingertips!! But this is the hardest way (another reason to choose it!-))
When I went “use pre-compiled binaries” way – it sort of did some work, but I suddenly noticed I’ve only 256M of RAM visible to the system instead of 512M. Also GPIO pin number was compiled into the provided solution, what if I originally soldered it different way? What if you want to play with some params and add/remove something to/from your kernel to optimize things a bit? You kinda got “ready-to-use” pill, but it makes you addictive (as all pills do:) and you have traded your freedom of actions for choosing this shortcut which will strike you one way or another later. “Pre-compiled binaries” are like band-aid hacks vs. normal solutions. It is again – not cool 🙂
The high level roadmap goes like this:
– buy parts
– solder 5 wires 🙂
– install OS by downloading official image
we’ll use RASPBIAN Debian Wheezy (Kernel version:3.10) – it comes compiled
and we will not have sources, but it is well configured for raspberry pi hardware and
needs only a few modifications 🙂
– download linux sources
switch to almost the latest shinty kernel version: 3.13.10+
(as of now – the latest for now 3.14 didn’t fly for me (can’t compile due to some unresolvable configuration issues))
– configure downloaded linux to enable few modules
at this step we will reuse configuration from official release for 3.10 and only answer
few additional question for some new features added between 3.10 and 3.13
This is a key step. I tried to build own config from scratch about only 10 times
each iteration is 1 sleepless night 🙂 and
each time raspberry would fail to boot (I got the so called “rainbow screen of death”
(actually it is just four pixels "blown up" by the GPU to full screen:))
– apply a small patch to support GPIO on pin 23 for PPS (pulse per second) from GPS device
– install crosstool-NG toolchains on some powerfull Ubuntu 12.04LTS box
– cross-compile new kernel for ARMv6 CPU
– update raspberry pi firmware
– update/upgrade all debian wheezy components
– upload/install new compiled kernel + modules to raspberry pi
– rebuild NTP server from sources with some new configuration options
– configure/enable PPS driver
– configure/enable serial link (to read NMEA sentences from/to GPS unit)
– configure installed NTP daemon
– optionally add a few monitoring pieces
so we can see the health of NTP and whole system over time
– add few things to start all required pieces on boot (to survive reboots)
– make backup image of the flash drive and put it on the shelf 🙂
– reboot
– enjoy 🙂
alternative road map would be:
– buy parts
– solder 5 wires
– ask Dmitry to send ready-to-go SD card image for the device!
– enjoy
or even:
– buy ready device
– enjoy
🙂
Buy parts
Qty. Products Total
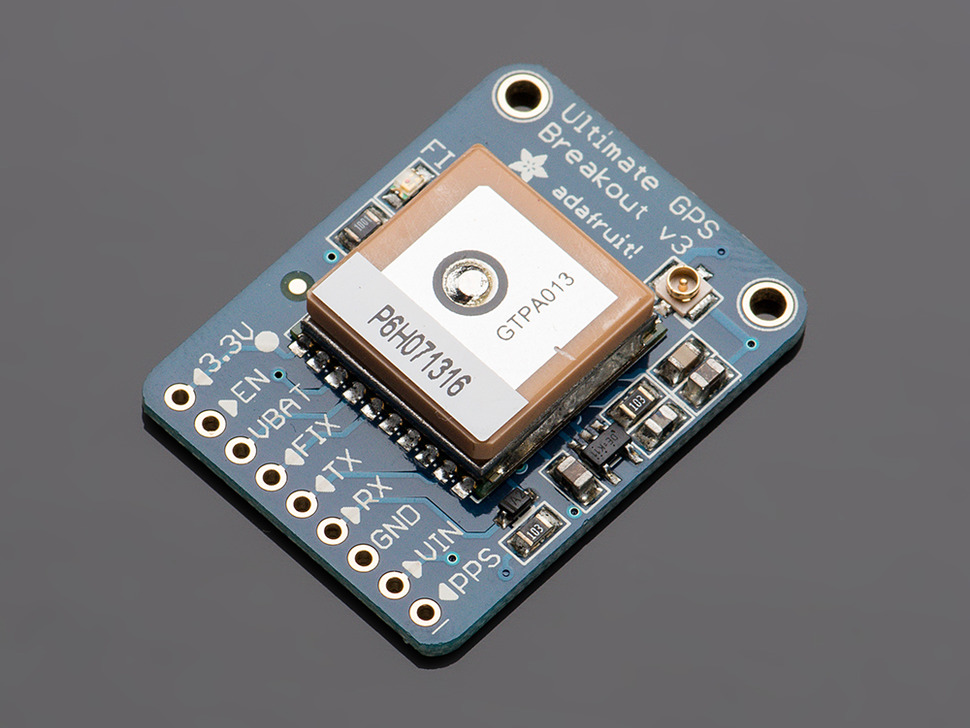
1 Adafruit Ultimate GPS Breakout – 66 channel w/10 Hz updates $39.95
Qty. Products Total
1 Premium Female/Male 'Extension' Jumper Wires – 40 x 3" (75mm) $6.95

Sub-Total: $46.90
Sales Tax: $0.00
United States Postal Service (0.19lbs) (First-Class Package International Service incl. $1.60 insurance):$10.25
Total:$57.15cad
Raspberry Pi Model B with 8GB SD Card, NOOBS Pre-Installed $43cad

OKW Enclosures TEK-BERRY.33 $7cad or better try to find fully transparent one!

As for the power supply I assume you have micro-usb charger from your old cell phone…
5V 1.0-1.5Amps will do.
(Optional) Power over Ethernet (PoE)
Sometimes it is preferable to keep GPS antenna outside. For example there’s no great visibility from your window or there’s no window or you don’t want keep any circuitry+wires in sight or you have kid(s) who just loves to put things apart : )
There are few solutions out there:
– start using external GPS antenna with long cable
– or hide NTP server somewhere in your attic and use external antenna
– or move all pieces (raspberry-pi + antenna) to the harsh outdoor environment
Remember – for the 2nd and 3rd options you’d still have to provide remote device with Ethernet and +5V power.
Wi-Fi dongle can potentially be used instead of Ethernet cable, but it will increase network delay as well as network delay jitter, so it will lower the quality of time syncing solution to about 1 order of magnitude (example: your windows box polling NTP updates each 8 seconds from Raspberry-Pi NTP server will have about +/- 2 millisecond precision when connected over Ethernet vs. +/- 20..30 millisec over WiFi))
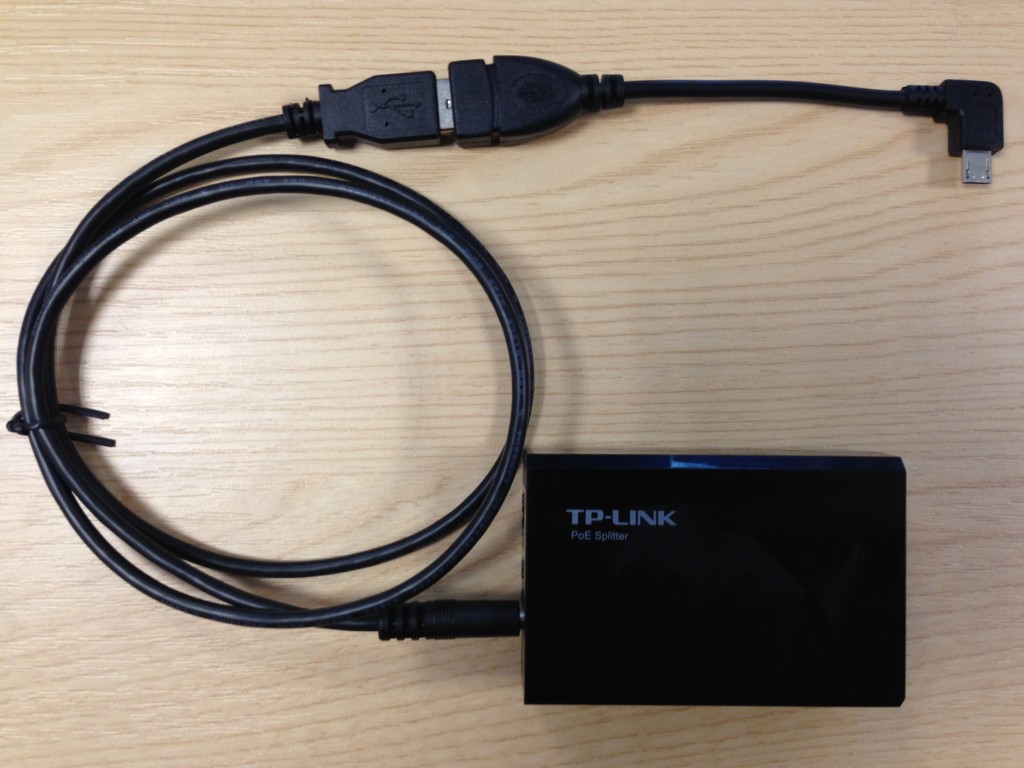
One of elegant and cheap (up to $30) solutions would be to deliver required power over Ethernet!
You can buy PoE splitter like this:

It uses PoE 48V and then converts it down to either 5V, 9V or 12V which you can choose by little switch.
Here’s the link to Peter Haban’s blog with more details on this.
And I’ll quote part of his nice article here to have this doc complete and independent of origin blog existance:
(quote)
So far so good, I had successfully converted down from POE to 5V so I set out to find some adapters on Amazon. Once I had identified the type of barrel I was working with (the Arduino documentation gave it away as a 2.1mm) it wasn’t too hard to find an adapter from said 2.1mm barrel to a standard USB plug. As far as I know these sort of adapters are/were used to charge older mobile phones off a USB port.

Almost there, just needed to get down to micro USB which is the type of socket used for the power socket on the Raspberry Pi. Guess this stage would already have been sufficient to run the Pi by simply plugging this USB plug into one of the Pi’s USB sockets but I usually try to keep those free to hook up a USB keyboard and mouse in emergencies. The last missing link in form of a USB to micro USB adapter was easy to find. Biggest challenge was to find a nice one that would not come from Hong Kong for £9.50 shipping each…

Right then, all together this is what the result looks like. I’ve successfully tested this today with a recent Pi model

3. Shopping list of links for what I bought to get the above:
TP LINK PoE Splitter – TL-POE10R
Link to manufacturer website – Link to Dabs
£10.60 each
StarTech 3 feet USB to Type M Barrel 5V DC Power Cable
£2.70 each
USB 2.0 A female to Micro USB B male Adapter Cable
£1.50 each
(end of quote from Peter Haban’s blog)
Again – this “Power over Ethernet” is just an optional solution for those who wants to allocate hardware far from regular convenient power sources (ex: on the roof) and normally is not required, so don’t be afraid and/or discouraged!
😉
1st attempt: Raspberry Flavored Time (pre-compiled kernel and modules) – skip this
even though it sort of works…
src: http://open.konspyre.org/blog/2012/10/18/raspberry-pi-time-server/
and it almost worked, but I had 256M RAM visible (instead of 512M RAM)
free -m
total used free shared buffers cached
Mem: 246 162 84 0 39 68
http://open.konspyre.org/blog/2012/10/18/raspberry-pi-time-server/
Then I tried to unlock another 256M of RAM by following this guide:
—————————————–(quote)————————————————
Unlocking your new Raspberry PI’s 512MB of Memory!
Update: The new Raspbian image supports this out of the box now. The below instructions should no longer be necessary
A newer version of the Raspberry PI Model B has been release a few days ago, with 512mb of RAM (as opposed to 256MB). Using Raspbian as your OS, you will need to update the RaspberryPI’s boot firmware in order to take advantage of the new memory upgrade. To determine how much RAM your OS is currently seeing, you can do “free -h” at the prompt.
All the steps below are using SSH, as I don’t use the GUI on my RPi.
Login
Login to your RaspberryPI through SSH. Default credentials are:
Username: pi
Password: raspberry
Upgrading the Software/Kernel
sudo -i
apt-get update
apt-get upgrade
Updating the Firmware
Note: Hexxeh’s rpi-update script is currently broken, so we’ll need to do this manually.
In /boot/, download (and overwrite if already exists) all files from here:
https://github.com/raspberrypi/firmware/tree/master/boot
Hexxeh’s Rpi-Update script has now been updated, so you can follow the following steps:
rm -rf /boot/*.elf /boot/*.bin /boot/*.img
apt-get install git
apt-get install ca-certificates
wget http://goo.gl/1BOfJ -O /usr/bin/rpi-update && sudo chmod +x /usr/bin/rpi-update
/usr/bin/rpi-update
The Memory Split
On the RaspberryPI, GPU (video) and system memory are shared. That means if your RPi has 512mb of RAM, some of that RAM will be reserved to use as video memory. Since my RPi doesn’t use the GUI, I set my GPU memory to be 16MB. If you are using a GUI, you may want to go with 64, 128, or even 256MB of GPU ram.
Edit /boot/config.txt and add the following line at the bottom of the file:
gpu_mem=16
Conclusions
At this point reboot you box and run “free -h”. You should see the updated memory configuration!
——————————————————————————————————————–
[problems with “pre-compiled binaries” approach]
Only 256M (of 512M available on board) are visible to the OS, but when I’m trying to expand it I then I can see 512M of RAM, but I don’t have /dev/pps0 device, only /dev/ttyAMA0 (serial in for NMEA sentences) in which case ntpq -p shows me 30ms jitter (vs. expected “less than 4 microsec” jitter when PPS is working). I tried to use modules from “working kernel+modules (from Linux 3.1.9adafruit-pps+ #21 PREEMPT) set =to=> newer 3.10.xx kernel, but it seems must compile.. “just moving files around” approach doesn’t work as it would for windows :))
so – the goals are:
– to have own compiled LINUX kernel
– with latest firmware (to see all 512M of ram)
– with working everything 🙂 patched latest ntpd+pps
Build a cross compiler for your Raspberry Pi

found here: http://www.bootc.net/archives/2012/05/26/how-to-build-a-cross-compiler-for-your-raspberry-pi/
As a cross compiler host I used Amazon EC2 m1.large instance running 64bit Ubuntu 12.04LTS (use Amazon EC2 AMI Locator to find AMI). One iteration to compile kernel (depends on selected features) takes from 25 to 45 minutes. For comparison:
(quote from http://elinux.org/RPi_Kernel_Compilation)
A compilation of the latest kernel and modules took about 752 minutes (12h:30m)!
(end of quote)
# as root:
apt-get update
apt-get upgrade
apt-get install build-essential
apt-get install -y flex bison ncurses-dev texinfo gcc gperf patch libtool automake g++
apt-get install -y mc 😉
apt-get install -y gawk
apt-get install subversion
adduser pi
# mcedit /etc/sudoers, and dd following line:
pi ALL=NOPASSWD: ALL
# take latest crosstool-NG:
-> http://crosstool-ng.org/download/crosstool-ng/
download: crosstool-ng-1.19.0.tar.bz2
wget http://crosstool-ng.org/download/crosstool-ng/crosstool-ng-1.19.0.tar.bz2
tar xf ./crosstool-ng-1.19.0.tar.bz2
cd crosstool-ng-1.19.0/
./configure –prefix=/opt/cross
make
sudo make install
# sudo mcedit /etc/profile, add a line:
export PATH="${PATH}:/opt/cross/bin/"
# relogin as 'pi' and try to run:
ct-ng help
ct-ng list-samples
ct-ng show-arm-unknown-linux-gnueabi
——————————————————- example output ————————(begin)
pi@ip-10-253-21-80:~$ ct-ng help
This is crosstool-NG version 1.19.0
Copyright (C) 2008 Yann E. MORIN <yann.morin.1998@free.fr>
This is free software; see the source for copying conditions.
There is NO warranty; not even for MERCHANTABILITY or FITNESS FOR A
PARTICULAR PURPOSE.
See below for a list of available actions, listed by category:
Configuration actions:
menuconfig – Update current config using a menu based program
oldconfig – Update current config using a provided .config as base
extractconfig – Extract to stdout the configuration items from a
build.log file piped to stdin
savedefconfig – Save current config as a mini-defconfig to ${DEFCONFIG}
defconfig – Update config from a mini-defconfig ${DEFCONFIG}
(default: ${DEFCONFIG}=./defconfig)
saveconfig – Save current config as a preconfigured target
show-tuple – Print the tuple of the currently configured toolchain
Preconfigured toolchains (#: force number of // jobs):
list-samples – prints the list of all samples (for scripting)
show-<sample> – show a brief overview of <sample> (list with list-samples)
<sample> – preconfigure crosstool-NG with <sample> (list with list-samples)
build-all[.#] – Build *all* samples (list with list-samples) and install in
${CT_PREFIX} (which you must set)
Build actions (#: force number of // jobs):
build[.#] – Build the currently configured toolchain
list-steps – List all build steps
Clean actions:
clean – Remove generated files
distclean – Remove generated files, configuration and build directories
Distribution actions:
wiki-samples – Print a DokuWiki table of samples
updatetools – Update the config tools
tarball – Build a tarball of the configured toolchain
Environment variables (see /opt/cross/share/doc/crosstool-ng/ct-ng.1.19.0/0 – Table of content.txt):
STOP=step – Stop the build just after this step (list with list-steps)
RESTART=step – Restart the build just before this step (list with list-steps)
CT_PREFIX=dir – install samples in dir (see action "build-all", above).
V=0|1|2 – 0 => show only human-readable messages (default)
1 => show only the commands being executed
2 => show both
Use action "menuconfig" to configure your toolchain
Use action "build" to build your toolchain
Use action "version" to see the version
See "man 1 ct-ng" for some help as well
pi@ip-10-253-21-80:~$ ct-ng list-samples
Status Sample name
LN config
MKDIR config.gen
IN config.gen/arch.in
IN config.gen/kernel.in
IN config.gen/cc.in
IN config.gen/binutils.in
IN config.gen/libc.in
IN config.gen/debug.in
[G.X] alphaev56-unknown-linux-gnu
[G.X] alphaev67-unknown-linux-gnu
[G.X] arm-bare_newlib_cortex_m3_nommu-eabi
[G.X] arm-cortex_a15-linux-gnueabi
[G..] arm-cortex_a8-linux-gnueabi
[G.X] arm-cortexa9_neon-linux-gnueabihf
[G..] arm-davinci-linux-gnueabi
[G..] armeb-unknown-eabi
[G.X] armeb-unknown-linux-gnueabi
[G.X] armeb-unknown-linux-uclibcgnueabi
[G..] arm-unknown-eabi
[G..] arm-unknown-linux-gnueabi
[G.X] arm-unknown-linux-uclibcgnueabi
[G.X] armv6-rpi-linux-gnueabi
[G..] avr32-unknown-none
[G..] bfin-unknown-linux-uclibc
[G..] i586-geode-linux-uclibc
[G.X] i586-mingw32msvc,i686-none-linux-gnu
[G.X] i686-nptl-linux-gnu
[G.X] i686-unknown-mingw32
[G.X] m68k-unknown-elf
[G.X] m68k-unknown-uclinux-uclibc
[G.X] mips64el-n32-linux-uclibc
[G.X] mips64el-n64-linux-uclibc
[G.X] mips-ar2315-linux-gnu
[G..] mipsel-sde-elf
[G..] mipsel-unknown-linux-gnu
[G.X] mips-malta-linux-gnu
[G..] mips-unknown-elf
[G.X] mips-unknown-linux-uclibc
[G..] powerpc-405-linux-gnu
[G.X] powerpc64-unknown-linux-gnu
[G..] powerpc-860-linux-gnu
[G.X] powerpc-e300c3-linux-gnu
[G.X] powerpc-e500v2-linux-gnuspe
[G..] powerpc-unknown-linux-gnu
[G..] powerpc-unknown-linux-uclibc
[G..] powerpc-unknown_nofpu-linux-gnu
[G.X] s390-ibm-linux-gnu
[G.X] s390x-ibm-linux-gnu
[G..] sh4-unknown-linux-gnu
[G..] x86_64-unknown-linux-gnu
[G..] x86_64-unknown-linux-uclibc
[G.X] x86_64-unknown-mingw32
L (Local) : sample was found in current directory
G (Global) : sample was installed with crosstool-NG
X (EXPERIMENTAL): sample may use EXPERIMENTAL features
B (BROKEN) : sample is currently broken
pi@ip-10-253-21-80:~$ ct-ng show-arm-unknown-linux-gnueabi
IN config.gen/arch.in
IN config.gen/kernel.in
IN config.gen/cc.in
IN config.gen/binutils.in
IN config.gen/libc.in
[G..] arm-unknown-linux-gnueabi
OS : linux-3.10.2
Companion libs : gmp-4.3.2 mpfr-2.4.2 libelf-0.8.13
binutils : binutils-2.19.1a
C compiler : gcc-4.3.2 (C,C++,Fortran,Java)
C library : glibc-2.9 (threads: nptl)
Tools : dmalloc-5.5.2 duma-2_5_15 gdb-6.8a ltrace-0.5.3 strace-4.5.19
——————————————————- example output ————————(end)
read to familarize a bit of: http://crosstool-ng.org/
it also shows supported target architectures crosstool-NG currently supports
sudo su -l pi
Further commands executed on behalf of pi user:
# Create a directory somewhere in your home directory
# that crosstool-ng will use as a staging ground.
# This will contain your toolchain configuration,
# downloaded files, and intermediary build results.
# This is not where your final toolchain will end up,
# and does take up quite a lot of space (3.5GB and
# up for me). cd into your chosen directory.
#
mkdir /home/pi/crosstool-ng-staging/
cd /home/pi/crosstool-ng-staging/
cd into your chosen directory.
Run ct-ng menuconfig. You should see the ct-ng configuration menu.
Go into Paths and misc options. Enable Try features marked as EXPERIMENTAL. This is important.
[*] Try features marked as EXPERIMENTAL
While you’re there you may want to change your Prefix directory. I like to put all my toolchains in /opt/cross/x-tools/${CT_TARGET} instead of ${HOME}/x-tools/${CT_TARGET}.
Go back to the main menu and select Target options.
Change the Target architecture to arm. Leave Endianness set to Little endian and Bitness set to 32-bit.
Go back to the main menu and select Operating system (skip Toolchain options, the defaults are fine).
Change Target OS to linux.
Go back to the main menu and select Binary utilities.
Change binutils version to 2.21.1a or whichever is the latest that isn’t marked as experimental. Probably unnecessary but I prefer this.
Go back to the main menu and select C compiler.
Enable the Show Linaro versions (EXPERIMENTAL) option.
In the gcc version field, choose the linaro-4.6-2012.04 (EXPERIMENTAL) compiler. You’re free to choose a different one but I know this one works well. I do recommend the Linaro versions over the vanilla ones for the RPi.
All the other settings are fine left at their default values. Exit the configuration tool and save your changes.
Run ct-ng build.
ct-ng build
==================== successfull ct-ng build output (begin) ==============
pi@ip-10-253-21-80:~/crosstool-ng-staging$ ct-ng build
[INFO ] Performing some trivial sanity checks
[INFO ] Build started 20140410.235711
[INFO ] Building environment variables
[INFO ] =================================================================
[INFO ] Retrieving needed toolchain components' tarballs
[WARN ] Could not retrieve 'eglibc-2_17'
[ERROR]
[ERROR] >>
[ERROR] >> Build failed in step 'Retrieving needed toolchain components' tarballs'
[ERROR] >> called in step '(top-level)'
[ERROR] >>
[ERROR] >> Error happened in: do_libc_get[scripts/build/libc/eglibc.sh@815]
[ERROR] >> called from: main[scripts/crosstool-NG.sh@580]
[ERROR] >>
[ERROR] >> For more info on this error, look at the file: 'build.log'
[ERROR] >> There is a list of known issues, some with workarounds, in:
[ERROR] >> '/opt/cross/share/doc/crosstool-ng/ct-ng.1.19.0/B – Known issues.txt'
[ERROR]
[ERROR] (elapsed: 0:03.96)
[00:04] / make: *** [build] Error 1
pi@ip-10-253-21-80:~/crosstool-ng-staging$ ct-ng build
[INFO ] Performing some trivial sanity checks
[INFO ] Build started 20140411.000224
[INFO ] Building environment variables
[INFO ] =================================================================
[INFO ] Retrieving needed toolchain components' tarballs
[INFO ] Retrieving needed toolchain components' tarballs: done in 60.69s (at 01:05)
[INFO ] =================================================================
[INFO ] Extracting and patching toolchain components
[INFO ] Extracting and patching toolchain components: done in 98.71s (at 02:44)
[INFO ] =================================================================
[INFO ] Installing GMP for host
[INFO ] Installing GMP for host: done in 117.55s (at 04:42)
[INFO ] =================================================================
[INFO ] Installing MPFR for host
[INFO ] Installing MPFR for host: done in 42.38s (at 05:24)
[INFO ] =================================================================
[INFO ] Installing ISL for host
[INFO ] Installing ISL for host: done in 39.27s (at 06:03)
[INFO ] =================================================================
[INFO ] Installing CLooG for host
[INFO ] Installing CLooG for host: done in 15.31s (at 06:19)
[INFO ] =================================================================
[INFO ] Installing MPC for host
[INFO ] Installing MPC for host: done in 18.37s (at 06:37)
[INFO ] =================================================================
[INFO ] Installing binutils for host
[INFO ] Installing binutils for host: done in 128.51s (at 08:46)
[INFO ] =================================================================
[INFO ] Installing pass-1 core C compiler
[INFO ] Installing pass-1 core C compiler: done in 527.38s (at 17:33)
[INFO ] =================================================================
[INFO ] Installing kernel headers
[INFO ] Installing kernel headers: done in 16.46s (at 17:50)
[INFO ] =================================================================
[INFO ] Installing C library headers & start files
[INFO ] Installing C library headers & start files: done in 45.11s (at 18:35)
[INFO ] =================================================================
[INFO ] Installing pass-2 core C compiler
[INFO ] Installing pass-2 core C compiler: done in 787.49s (at 31:42)
[INFO ] =================================================================
[INFO ] Installing C library
[INFO ] Installing C library: done in 626.01s (at 42:08)
[INFO ] =================================================================
[INFO ] Installing final compiler
[INFO ] Installing final compiler: done in 770.51s (at 54:59)
[INFO ] =================================================================
[INFO ] Cleaning-up the toolchain's directory
[INFO ] Stripping all toolchain executables
[INFO ] Cleaning-up the toolchain's directory: done in 3.63s (at 55:03)
[INFO ] Build completed at 20140411.005726
[INFO ] (elapsed: 55:01.66)
[INFO ] Finishing installation (may take a few seconds)…
[55:03] / pi@ip-10-253-21-80:~/crosstool-ng-staging$
==================== successfull ct-ng build output (end) ==============
You should end up with a freshly baked arm compiler ready for building kernels (and
other things) for your Raspberry Pi in your Prefix directory you chose above.
Just add your compiler directory to your $PATH and start compiling. If you used
my preferred prefix directory, you would want to add /opt/cross/x-tools/arm-unknown-linux-gnueabi/bin.
I modified /etc/profile line:
export PATH="${PATH}:/opt/cross/bin"
to
export PATH="${PATH}:/opt/cross/bin:/home/pi/x-tools/arm-unknown-linux-gnueabi/bin"
Now give your cross-compiler a quick sanity check
pi@ip-10-253-21-80:~$ arm-unknown-linux-gnueabi-gcc –version
arm-unknown-linux-gnueabi-gcc (crosstool-NG 1.19.0) 4.8.2 20130603 (prerelease)
Copyright (C) 2013 Free Software Foundation, Inc.
This is free software; see the source for copying conditions. There is NO
warranty; not even for MERCHANTABILITY or FITNESS FOR A PARTICULAR PURPOSE.
bootc@tarquin ~ $ cat > test.c
#include <stdio.h>
int main() { printf("Hello, world!\n"); return 0; }
^D
bootc@tarquin ~ $ arm-unknown-linux-gnueabi-gcc -o test test.c
bootc@tarquin ~ $
now scp ./test to raspberry and try to run it:
pi@chronos ~ $ ./test
Hello, world!
pi@chronos ~ $
Wow! Our “Hello, world!” is actually working on raspberry!!!

Raspberry Pi Stratum 1 NTP server with PPS (customize your kernel)
so – the goals are:
– to have own compiled LINUX kernel
– with latest firmware (to see all 512M of ram)
– with working everything 🙂 patched latest ntpd+pps
To achieve these goals I found another tutorial:)
Accurate timekeeping at low cost
here: http://ntpi.openchaos.org/pps_pi/
This approach is also based on:
– general RPi kernel compilation wiki
– a forum thread
– how to move things around, Making Links In /etc/udev and more…
http://open.konspyre.org/blog/2012/10/18/raspberry-pi-time-server/
– and of cause: http://ntpi.openchaos.org/pps_pi/
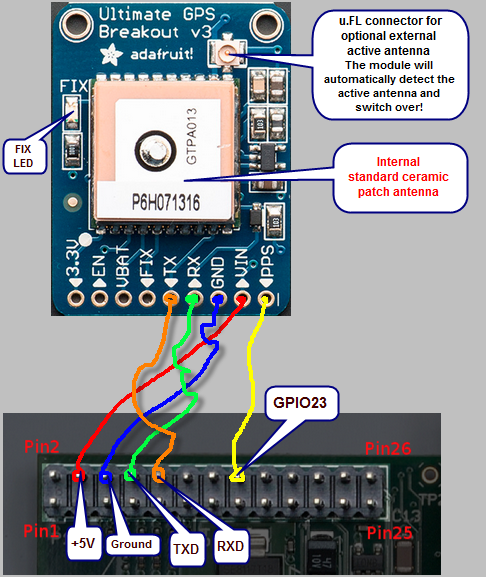
Solder 5 wires
GPS RPI
— —
RX –> TXD
TX –> RXD
PPS –> GPIO #23 NOTE: we’ll use GPIO #23 for PPS
GND –> GND
VIN –> 5V0
image found on http://elinux.org/RPi_Low-level_peripherals (see for more details)
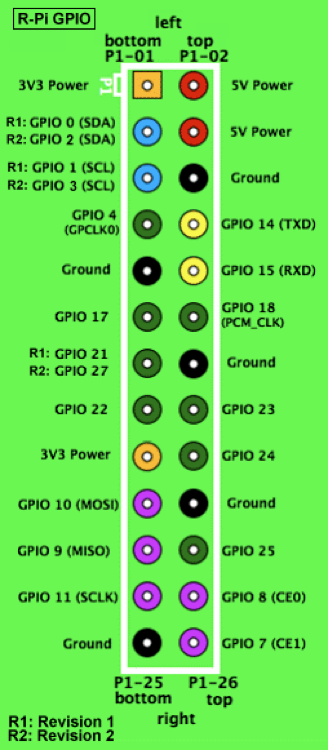
GPIO voltage levels are 3.3 V and are not 5 V tolerant. There is no over-voltage protection on the board
P1 Header Pinout, top row:
|
Pin Number |
Pin Name Rev1 |
Pin Name Rev2 |
Hardware Notes |
Alt 0 Function |
Other Alternative Functions |
|
P1-02 |
5V0 |
|
Supply through input poly fuse |
|
|
|
P1-04 |
5V0 |
|
Supply through input poly fuse |
|
|
|
P1-06 |
GND |
|
|
|
|
|
P1-08 |
GPIO 14 |
|
Boot to Alt 0 -> |
UART0_TXD |
ALT5 = UART1_TXD |
|
P1-10 |
GPIO 15 |
|
Boot to Alt 0 -> |
UART0_RXD |
ALT5 = UART1_RXD |
|
P1-12 |
GPIO 18 |
|
|
PCM_CLK |
ALT4 = SPI1_CE0_N ALT5 = PWM0 |
|
P1-14 |
GND |
|
|
|
|
|
P1-16 |
GPIO23 |
|
|
|
ALT3 = SD1_CMD ALT4 = ARM_RTCK |
|
P1-18 |
GPIO24 |
|
|
|
ALT3 = SD1_DAT0 ALT4 = ARM_TDO |
|
P1-20 |
GND |
|
|
|
|
|
P1-22 |
GPIO25 |
|
|
|
ALT3 = SD1_DAT1 ALT4 = ARM_TCK |
|
P1-24 |
GPIO08 |
|
|
SPI0_CE0_N |
|
|
P1-26 |
GPIO07 |
|
|
SPI0_CE1_N |
|
P1 Header Pinout, bottom row:
|
Pin Number |
Pin Name Rev1 |
Pin Name Rev2 |
Hardware Notes |
Alt 0 Function |
Other Alternative Functions |
|
P1-01 |
3.3 V |
|
50 mA max (01 & 17) |
|
|
|
P1-03 |
GPIO 0 |
GPIO 2 |
1K8 pull up resistor |
I2C0_SDA /I2C1_SDA |
|
|
P1-05 |
GPIO 1 |
GPIO 3 |
1K8 pull up resistor |
I2C0_SCL /I2C1_SCL |
|
|
P1-07 |
GPIO 4 |
|
|
GPCLK0 |
ALT5 = ARM_TDI |
|
P1-09 |
GND |
|
|
|
|
|
P1-11 |
GPIO17 |
|
|
|
ALT3 = UART0_RTS ALT4 = SPI1_CE1_N ALT5 = UART1_RTS |
|
P1-13 |
GPIO21 |
GPIO27 |
|
PCM_DOUT /reserved |
ALT4 = SPI1_SCLK ALT5 = GPCLK1 / ALT3 = SD1_DAT3 ALT4 = ARM_TMS |
|
P1-15 |
GPIO22 |
|
|
|
ALT3 = SD1_CLK ALT4 = ARM_TRST |
|
P1-17 |
3.3 V |
|
50 mA max (01 & 17) |
|
|
|
P1-19 |
GPIO10 |
|
|
SPI0_MOSI |
|
|
P1-21 |
GPIO9 |
|
|
SPI0_MISO |
|
|
P1-23 |
GPIO11 |
|
|
SPI0_SCLK |
|
|
P1-25 |
GND |
|
|
|
|
|
Colour legend |
|
+5 V |
|
+3.3 V |
|
Ground, 0V |
|
UART |
|
GPIO |
|
SPI |
|
I²C |
————————————————————————————————————–
1) on the cross compile host do all as ‘pi’ user
# ssh into cross-compile host and become ‘pi’ properly:
sudo su -l pi
cd /home/pi/crosstool-ng-staging
————————————————————————————————————–
2) download kernel src
The kernel source should be downloaded from the RPI linux section on GitHub
git clone https://github.com/raspberrypi/linux
————————————————————————————————————–
3) set an environment variables
I did it on the /etc/profile and /home/pi/.profile, so I don’t need to do this step over and over again, just switch user to “pi” and environment is there!
cat /etc/profile
[skipped]
export PATH="${PATH}:/opt/cross/bin:/home/pi/x-tools/arm-unknown-linux-gnueabi/bin"
cat /home/pi/.profile
[skipped]
export CCPREFIX=/home/pi/x-tools/arm-unknown-linux-gnueabi/bin/arm-unknown-linux-gnueabi-
export ARCH=arm
export CROSS_COMPILE=${CCPREFIX}
export KERNEL_SRC=/home/pi/crosstool-ng-staging/linux
# if you forgot where you’ve installed your cross-compile tools use:
which arm-unknown-linux-gnueabi-gcc
————————————————————————————————————–
4) switch to desired version of kernel
example: git checkout rpi-3.14.y
was on rpi-3.10.y for some reason :-\ (and failed to compile with error:
# more detailed git branch switch process:
cd /home/pi/crosstool-ng-staging/linux
git status
# On branch rpi-3.10.y
nothing to commit (working directory clean)
# list remote branches
git branch -r
origin/HEAD -> origin/rpi-3.10.y
origin/master
origin/rpi-3.10.y <—- we use this as a starting point when we take precompiled SD image
origin/rpi-3.10.y-next
origin/rpi-3.11.y
origin/rpi-3.12.y
origin/rpi-3.13.y <—- we build this one, since 3.14 had some issues with configuration/compilation
origin/rpi-3.13.y-next
origin/rpi-3.14.y
origin/rpi-3.2.27
origin/rpi-3.6.y
origin/rpi-3.8.y
origin/rpi-3.9.y
origin/rpi-patches
# switch branch (should have git –version >=1.6.6)
git checkout rpi-3.14.y
# sanity check
git status
# On branch rpi-3.14.y
nothing to commit (working directory clean)
————————————————————————————————————–
5) clean the kernel source with "make mrproper"
# if you tried to build in this folder before you gotta clean up before anything else 🙂
cd /home/pi/crosstool-ng-staging/linux
make mrproper
Note: it will delete your “.config” file as well, so copy it to some backup folder to preserve if needed.
————————————————————————————————————–
6) Pull the /proc/config.gz from the running Raspbian 3.10 installation
# unzip it
gunzip config.gz
# upload resulting “.config” file into your linux folder (root of linux git project)
————————————————————————————————————–
7) Prime kernel with the old config by running: make oldconfig
ARCH=arm CROSS_COMPILE=${CCPREFIX} make oldconfig
Note: You’ll be asked about Timer frequency
I choose :
option #3. 250 Hz (HZ_250) (NEW)
after googling around I found “r-pi system clock is 250MHz”
Leave all the other questions with default answers and just hit <enter> many times 🙂
read: What does “make oldconfig” do exactly?
————————————————————————————————————–
7a) Use menu to build final .config:
ARCH=arm CROSS_COMPILE=${CCPREFIX} make menuconfig
Enable modules Device Drivers/PPS support/PPS support and PPS client using GPIO
Device Drivers / Sound Card Support (uncheck – we don’t need it)
Device Driver / Network device support / Wireless LAN (uncheck – we won’t need it)
————————————————————————————————————–
7b) Some of Failed Config attempts (ignore it, it is just for the record here)
system type-> ARM system type “allow multiple platforms to be selected”
multiple platform selection-> ARMv6 (*) HUNG ON RAINBOW SCREEN
(todo: since I now know proper settings for this item – put it here..)
—————– config attempt 2 of 3
————————— if not working try also other platform selection:
> System Type —>
> ARM system type (ARM Ltd. Versatile family) —>
> (X) ARM Ltd. Versatile family
>
src: https://gist.github.com/chattama/3443835
HUNG ON RAINBOW SCREEN
—————– config attempt 3 of 3
just try to follow all as is in
src: https://gist.github.com/chattama/3443835
HUNG ON RAINBOW SCREEN
—————– config attempt 4
You can peek on some of your CPU properties by:
pi@chronos ~ $ cat /proc/cpuinfo
processor : 0
model name : ARMv6-compatible processor rev 7 (v6l)
BogoMIPS : 2.00
Features : swp half thumb fastmult vfp edsp java tls
CPU implementer : 0x41
CPU architecture: 7
CPU variant : 0x0
CPU part : 0xb76
CPU revision : 7
Hardware : BCM2708 <—— that is what we should use in .config as a target system!
Revision : 000d
Serial : 00000000b5719437
pi@chronos ~ $
————————————————————————————————————–
8) Patch the kernel to support GPIO pin 23
download and modify patch
Download the pps-gpio patch for the bcm2708 platform and clone the raspberry kernel tree:
cd /home/pi/crosstool-ng-staging/linux
wget https://raw.github.com/lampeh/rpi-misc/master/linux-pps/linux-rpi-pps-gpio-bcm2708.diff
Change the GPIO pin:
The patch defines GPIO 18 as PPS input because it’s right next to TX/RX on the RPi P1 header. If you want to move it to another GPIO pin, change the value of pps_gpio_info.gpio_pin.
Refer to the pin header overview for a mapping of GPIOs to header pins.
Dmitry: I use GPIO 23 (so had to modify diff file)
appy the patch:
patch -p1 <./linux-rpi-pps-gpio-bcm2708.diff
patching file arch/arm/mach-bcm2708/bcm2708.c
Hunk #2 succeeded at 381 (offset -39 lines).
Hunk #3 succeeded at 815 with fuzz 1 (offset 89 lines).
————————————————————————————————————–
9) Compile the kernel
Build the kernel and install the new modules. This takes a long time.
# this didn’t work for Dmitry: time nice make -j2
# it forcing me to go via config again(!), Next make works fine:
ARCH=arm CROSS_COMPILE=${CCPREFIX} time make -j2
————————————————————————————————————–
10) Install modules to some tmp folder (later we’ll pass’em to R-Pi)
# create a folder which we’ll pass to R-Pi from our crosscompile platform:
export UPLOAD_TO_PI=/home/pi/crosstool-ng-staging/upload-to-pi
rm -fr /home/pi/crosstool-ng-staging/upload-to-pi
mkdir "${UPLOAD_TO_PI}"
# install modules
INSTALL_MOD_PATH="${UPLOAD_TO_PI}" ARCH=arm CROSS_COMPILE=${CCPREFIX} time make modules_install
————————————————————————————————————–
11) convert compiled kernel into kernel.img
# Clone the raspberry tools repository (to convert compiled kernel)
cd /home/pi/crosstool-ng-staging
git clone –depth 1 git://github.com/raspberrypi/tools.git
# You might need to edit tools/mkimage/imagetool-uncompressed.py and replace
# "python2" in the first line with "python2.7" (or maybe just "python")
# Convert the compiled kernel into a raspberry kernel image:
cd tools/mkimage/
./imagetool-uncompressed.py ../../linux/arch/arm/boot/zImage
12) zip and upload to raspberry pi
# rename the new kernel:
mkdir ${UPLOAD_TO_PI}/boot
mv kernel.img ${UPLOAD_TO_PI}/boot/kernel_pps.img
# find & remove couple symlinks BEFORE uploading (or you’ll get 4+Gbyte vs 500Mb)
# this step is actually relevant only if you doing recursive scp “scp -r …”
# for our case: “zip then upload” it is not necessary
cd ${UPLOAD_TO_PI}
find . -type l
./lib/modules/3.13.10+/build
./lib/modules/3.13.10+/source
rm `find . -type l`
# zip it
cd $UPLOAD_TO_PI/..
tar czf ${UPLOAD_TO_PI}.tgz $UPLOAD_TO_PI
# upload by rsync to RPi:
rsync -av -e "ssh -p 8" ${UPLOAD_TO_PI}.tgz pi@your-pi-address.com:/home/pi/
# upload by scp
scp -P 8 -r ${UPLOAD_TO_PI}.tgz pi@your-pi-address.com:
# ———— we no longer need crosscompile host, shut it down..———————————
# —————————— all the rest will happen on Pi after this line 🙂 ————————–
On the Raspberry-Pi
Download and Install OS RASPBIAN Debian Wheezy
RASPBIAN Debian Wheezy
Version:January 2014
Release date:2014-01-07
Default login:pi / raspberry
URL:raspbian.org
Kernel version:3.10
Release notes:Link
Go through initial setup (starts automatically on boot)
This step will require HDMI connected monitor + usb keyboard. All the rest steps after you did initial setup and reboot wont require direct access to your R-Pi device and can be accomplished via ssh.
– update tool (advanced -> update)
– expand filesystem, so you have your whole SC card visible, not only 4G
– change password
– reboot
Update and few dependencies install
before we switch kernel to latest custom, let us update the rest of the system (imho it is safe time to do so BEFORE we put custom kern + modules)
pi@chronos ~ $ sudo su -l
apt-get update
apt-get upgrade
apt-get install -y mc git
Disable the serial console
By default, /dev/ttyAMA0 is a serial console for the kernel and also runs a getty process for logins.
- Disable the serial console in /boot/cmdline.txt:
mcedit /boot/cmdline.txt
remove console=ttyAMA0,115200 kgdboc=ttyAMA0,115200
- Disable the serial console in /etc/inittab (at the end of the file):
mcedit /etc/inittab
disable the line T0:23:respawn:/sbin/getty -L ttyAMA0 115200 vt100
Build the pps-gpio module
- Install wget, git and the ncurses development files:
apt-get install -y wget git libncurses5-dev
Load the pps-gpio module at startup
- Add to /etc/modules:
sudo sh -c "echo 'pps-gpio' >> /etc/modules"
Update the Raspberry Pi firmware
sudo su -l # became a root properly
cd /root
git clone –depth 1 git://github.com/raspberrypi/firmware.git
# install firmware
cd firmware/boot/
mv /boot/bootcode.bin /boot/bootcode.bin.old
mv /boot/fixup.dat /boot/fixup.dat.old
mv /boot/start.elf /boot/start.elf.old
cp bootcode.bin fixup.dat start.elf /boot/
# Install the utilities:
cd ../hardfp/opt/
mv /opt/vc /opt/vc.old
cp -a vc /opt/
Update kernel and modules
Now we will finally use “upload-to-pi.tgz” archive you upload to your R-Pi from remote cross-compile platform.
cd /root
time tar xf upload-to-pi.tgz
# why archive content starts with /home/pi/.. not just relative path? not critical – fix it later…
# Install the new kernel:
# Move the resulting kernel.img to the Raspberry Pi's /boot/ directory
mv ./home/pi/crosstool-ng-staging/upload-to-pi/boot/kernel_pps.img /boot
# Replace the default kernel in /boot/config.txt:
mcedit /boot/config.txt
kernel=kernel_pps.img
(this way you can roll back via direct access to SD card (say on your windows machine) and changing the kernel you wanna try next without need to reburn the whole SD image onto the card)
# move /lib/modules and /lib/firmware on top of existing ones (imho it should not overwrite firmware files brought by firmware update (see above))
mv ./home/pi/crosstool-ng-staging/upload-to-pi/lib/* /lib
mv: cannot move `./home/pi/crosstool-ng-staging/upload-to-pi/lib/firmware' to `/lib/firmware': Directory not empty
just use mc to move content to destination
Reboot R-Pi
sudo reboot
Test PPS and GPS
- Install the tools:
apt-get install pps-tools gpsd gpsd-clients
- dpkg-reconfigure gpsd
- start gpsd automatically Dmitry note: No need to autostart gpsd daemon! this gpsd is only one-time deal “for fun” we don’t need it during normal “production” hours of our NTP server!
- set device to /dev/ttyAMA0
- add option "-n"
- Test GPS
- run gpsmon to check the receiver output
- Test PPS
- run ppstest /dev/pps0
- by default, the PPS signal is only present if the GPS aquired a fix
- the module can be configured to always output a PPS, even without GPS fix. Refer to the "Receiver Description and Protocol Specification" for details
Example output: check PPS
Reboot to the new kernel and look for pps messages in the kernel log.
root@chronos:~# dmesg |grep pps
[ 10.993533] pps_core: LinuxPPS API ver. 1 registered
[ 11.001557] pps_core: Software ver. 5.3.6 – Copyright 2005-2007 Rodolfo Giometti <giometti@linux.it>
[ 11.013988] pps pps0: new PPS source pps-gpio.-1
[ 11.023756] pps pps0: Registered IRQ 193 as PPS source
[ 5093.879573] pps_ldisc: PPS line discipline registered
[ 5093.882472] pps pps1: new PPS source ttyAMA0
[ 5093.882897] pps pps1: source "/dev/ttyAMA0" added
Example output: uname -a
Linux raspberrypi 3.13.10+ #1 PREEMPT Mon Apr 21 14:02:37 UTC 2014 armv6l GNU/Linux
Example output: gpsd
root@chronos:~# gpsd -n /dev/ttyAMA0
root@chronos:~# ps aux | grep gps
nobody 2880 2.0 0.3 13168 1828 ? S<sl 16:46 0:00 gpsd -n /dev/ttyAMA0
Example output: gpsmon
localhost:2947: Generic NMEA>
┌──────────────────────────────────────────────────────────────────────────────┐":7,
│Time: 2014-04-21T16:47:36.000Z Lat: 43 28' 10.632" N Lon: 80 34' 35.994" W │tivated":"2014-04-21T16:47:09.650Z","flags":1,"driver":"Generic NMEA","native":0,"b
└───────────────────────────────── Cooked PVT ─────────────────────────────────┘
┌──────────────────────────────────────────────────────────────────────────────┐alse,"timing":false,
│ GPGGA GPGSA GPGSV GPRMC GPVTG │
└───────────────────────────────── Sentences ──────────────────────────────────┘
┌──────────────────┐┌────────────────────────────┐┌────────────────────────────┐
│Ch PRN Az El S/N ││Time: 164736.000 ││Time: 164737.000 │
│ 0 31 266 74 19 ││Latitude: 4328.1772 N ││Latitude: 4328.1772 │
│ 1 32 282 59 31 ││Longitude: 08034.5999 W ││Longitude: 08034.5999 │
│ 2 14 90 50 22 ││Speed: 0.12 ││Altitude: 354.3 │
│ 3 25 62 41 0 ││Course: 342.24 ││Quality: 1 Sats: 8 │
│ 4 51 216 33 0 ││Status: A FAA: A ││HDOP: 0.95 │
│ 5 20 311 25 19 ││MagVar: ││Geoid: -34.9 │
│ 6 22 163 19 18 │└─────────── RMC ────────────┘└─────────── GGA ────────────┘
│ 7 1 276 15 25 │┌────────────────────────────┐┌────────────────────────────┐
│ 8 12 36 13 26 ││Mode: A 3 ││UTC: RMS: │
│ 9 29 102 2 0 ││Sats: 25 32 14 22 31 1 12 2 ││MAJ: MIN: │
│10 ││DOP: H=0.95 V=0.80 P=1.24 ││ORI: LAT: │
│11 │└─────────── GSA ────────────┘│LON: ALT: │
└────── GSV ───────┘ └─────────── GST ────────────┘
(42) $GPGSV,3,3,10,12,13,036,26,29,02,102,*72\x0d\x0a
(72) $GPRMC,164735.000,A,4328.1772,N,08034.5998,W,0.16,342.24,210414,,,A*74\x0d\x0a
(39) $GPVTG,342.24,T,,M,0.16,N,0.29,K,A*32\x0d\x0a
(74) $GPGGA,164736.000,4328.1772,N,08034.5999,W,1,7,1.00,354.3,M,-34.9,M,,*66\x0d\x0a
(56) $GPGSA,A,3,32,14,22,31,01,12,20,,,,,,1.28,1.00,0.80*06\x0d\x0a
(72) $GPRMC,164736.000,A,4328.1772,N,08034.5999,W,0.12,342.24,210414,,,A*72\x0d\x0a
(39) $GPVTG,342.24,T,,M,0.12,N,0.22,K,A*3D\x0d\x0a
(74) $GPGGA,164737.000,4328.1772,N,08034.5999,W,1,8,0.95,354.3,M,-34.9,M,,*65\x0d\x0a
(58) $GPGSA,A,3,25,32,14,22,31,01,12,20,,,,,1.24,0.95,0.80*00\x0d\x0a
now searching on google maps: 43 28' 10.523" N, 80 34' 35.915" W
and have the location with about 2 meters error! (amazing!!)
example output: ppstest
root@chronos:~# ppstest /dev/pps0
trying PPS source "/dev/pps0"
found PPS source "/dev/pps0"
ok, found 1 source(s), now start fetching data…
source 0 – assert 1398098572.006546167, sequence: 4846 – clear 0.000000000, sequence: 0
source 0 – assert 1398098573.006546587, sequence: 4847 – clear 0.000000000, sequence: 0
source 0 – assert 1398098574.006548013, sequence: 4848 – clear 0.000000000, sequence: 0
source 0 – assert 1398098575.006546447, sequence: 4849 – clear 0.000000000, sequence: 0
source 0 – assert 1398098576.006546888, sequence: 4850 – clear 0.000000000, sequence: 0
source 0 – assert 1398098577.006548336, sequence: 4851 – clear 0.000000000, sequence: 0
source 0 – assert 1398098578.006547790, sequence: 4852 – clear 0.000000000, sequence: 0
Final tuning
– suppress NMEA sentences
– setup NTP server
– let it run few hours
Set up NTP server
I found two slightly different versions and not yet sure which one is better. One is from this tutorial: http://open.konspyre.org/blog/2012/10/18/raspberry-pi-time-server/
another is from this one: http://ntpi.openchaos.org/pps_pi/
I’ll quote both, but for now will try only 1st one
1st (of 2) way to setup NTP server:
*this is preferable way*
(quote)
Automatically Making Links In /etc/udev
By default, our setup isn’t usable by the NTP server since it expects data to be present at specific locations. By adding a few rules to udev, we can automatically make symbolic links (aliases, shortcuts, etc) from our NMEA serial and 1PPS data, to a place where NTP can read and interpret it.
If we didn’t create these rules, the NTP driver would get no data to process.
|
|
$ sudo nano /etc/udev/rules.d/80-gps-to-ntp.rules |
Installing and Configuring NTP
To install NTP, we abuse the default install a bit since the repository version doesn’t really pick up on 1PPS. It will also take some time to do all of this since we’re compiling from scratch.
|
|
$ sudo apt-get install ntp $ ./configure –prefix=/usr –enable-all-clocks –enable-parse-clocks \ |
Dmitry note #1: I’ll use “p440” version instead of “p319” as the most recent one. Here’s the link: http://www.eecis.udel.edu/~ntp/ntp_spool/ntp4/ntp-dev/ntp-dev-4.2.7p440.tar.gz
Check for updates, don’t trust outdated numbers!
Dmitry note #2: original article suggested to modify content of the file /etc/init.d/ntp like this:
DAEMON=/usr/bin/ntpd
#DAEMON=/usr/sbin/ntpd
, but I found that it would break init script since ntpd is actually installed into /usr/sbin, not /usr/bin, so no need to change, but worthwhile checking just in case where things actually are 🙂
|
|
|
Once you have been dropped back to the terminal, edit /etc/ntp.conf and add the following (be sure to change the broadcast line if it differs for you):
|
|
$ sudo nano /etc/ntp.conf # http://www.eecis.udel.edu/~mills/ntp/html/drivers/driver20.html explains |
For a general setup with an Internet connected Pi, leaving these uncommented is generally considered good practice.
|
|
server 0.debian.pool.ntp.org iburst |
What do the bits in the server line do? [3]
server 127.127.20.0 mode 17 minpoll 3 iburst true prefer
- 127.127.20.0: Specify the GPS_NMEA driver.
- mode 17: This sets the line speed (bit 4, dec: 16) to 9600 bps. Additionally, $GPRMC is processed (bit 0, dec: 1). We get a total sum of 17 when adding the decimal parts together (hence “mode 17”).
- minpoll: Minimum polling interval for NTP messages in a power of 2. Here, 3 = 8 seconds.
- iburst: If a server is unreachable, send a burst of eight packets instead of one.
- true: Let the server survive NTP’s algorithmic weeding.
- prefer: If we have a choice among good hosts (post-determination, etc), use this one for syncing.
fudge 127.127.20.0 flag1 1 time2 0.496
The fudge options are driver dependent. [4]
- 127.127.20.0: Specify the GPS_NMEA driver.
- flag1 1: Activate PPSAPI, and process the PPS signals we get.
- time2: Compensate slightly for transmission delays. Instructions for tuning this are located on the driver home page. Specifically, look for 7 (bit) / 128 (decimal) in the mode section.
A complete explanation of the flags used is provided at the website above. You can also just click here to be taken there as well.
Let us collect more NTP stats
mkdir /var/log/ntpstats/
chmod a+rwx /var/log/ntpstats/
# uncomment following line in your /etc/ntp.conf:
statsdir /var/log/ntpstats/
you should see stats files in /var/log/ntpstats/ folder after ntpd restarted
Reboot
Now that the kernel is updated, udev makes links properly, and NTP is installed+configured.. all that is left to do is pray to your local noodly appendage (or other $x of choice) and reboot.
|
|
$ sudo reboot |
Checking the time
Once you’re back up, wait for your GPS to lock (give it a view of the sky to make this process faster).
When your GPS is locked to a sufficient number of satellites (the Adafruit GPS module will blink intermittently), type ntpq -p into your Raspberry Pi’s console, and you’ll get something like this:
|
|
$ ntpq -p |
Unit Calibration (skip if not using Adafruit’s GPS module)
To get the best out of the Adafruit GPS unit, we will tune it so that it outputs only the sentences we need. In particular, we’re interested only in the $GPRMC lines.
Before continuing, ensure that the RX (GPS) to TXD (Raspberry Pi) line is connected. Add an extra wire if it isn’t.
Note that these changes are not permanent; they will be lost during a power cycle (install a battery to prevent this from happening), or reverted using another command. [5]
|
|
$ echo -e '$PMTK314,0,1,0,0,0,0,0,0,0,0,0,0,0,0,0,0,0,0,0*29\r\n' > /dev/ttyAMA0 |
if you run
cat /dev/ttyAMA0 <– before you issue above echo “..” to GPS device
then you’ll see all kinds of NMEA sentences (about 3-7 lines per second – depends on the number of satellites you’re tracking right now)
$GPGGA,172055.000,4328.1800,N,08034.5943,W,1,8,0.99,345.5,M,-34.9,M,,*66
$GPGSA,A,3,32,14,25,31,01,23,20,22,,,,,1.26,0.99,0.78*0B
$GPGSV,3,1,12,31,79,337,23,32,61,250,22,14,38,104,18,20,35,300,25*71
$GPGSV,3,2,12,25,32,049,18,23,11,299,19,29,11,090,,16,11,194,15*7F
$GPGSV,3,3,12,01,08,264,21,22,05,163,17,12,01,032,,47,,,*47
$GPRMC,172055.000,A,4328.1800,N,08034.5943,W,0.39,339.98,210414,,,A*78
$GPVTG,339.98,T,,M,0.39,N,0.72,K,A*3A
$GPGGA,172056.000,4328.1799,N,08034.5943,W,1,8,0.99,345.6,M,-34.9,M,,*69
$GPGSA,A,3,32,14,25,31,01,23,20,22,,,,,1.26,0.99,0.78*0B
$GPRMC,172056.000,A,4328.1799,N,08034.5943,W,0.45,339.98,210414,,,A*7F
$GPVTG,339.98,T,,M,0.45,N,0.84,K,A*38
$GPGGA,172057.000,4328.1798,N,08034.5942,W,1,8,0.99,345.6,M,-34.9,M,,*68
$GPGSA,A,3,32,14,25,31,01,23,20,22,,,,,1.26,0.99,0.78*0B
$GPRMC,172057.000,A,4328.1798,N,08034.5942,W,0.69,84.67,210414,,,A*45
$GPVTG,84.67,T,,M,0.69,N,1.28,K,A*04
$PMTK001,314,3*36
now after the above echo “…” to the GPS device we see that “cat /dev/ttyAMA0” only produces GPRMC NMEA sentences and only once per second!
$GPRMC,172058.000,A,4328.1795,N,08034.5941,W,0.69,87.30,210414,,,A*45
$GPRMC,172059.000,A,4328.1793,N,08034.5942,W,0.52,87.30,210414,,,A*49
$GPRMC,172100.000,A,4328.1794,N,08034.5948,W,1.56,299.53,210414,,,A*74
$GPRMC,172101.000,A,4328.1796,N,08034.5951,W,1.40,300.65,210414,,,A*7C
$GPRMC,172102.000,A,4328.1794,N,08034.5952,W,0.12,300.65,210414,,,A*78
$GPRMC,172103.000,A,4328.1788,N,08034.5950,W,0.65,138.25,210414,,,A*7B
$GPRMC,172104.000,A,4328.1786,N,08034.5948,W,0.92,136.63,210414,,,A*7F
$GPRMC,172105.000,A,4328.1788,N,08034.5947,W,0.69,132.76,210414,,,A*7B
$GPRMC,172106.000,A,4328.1784,N,08034.5944,W,0.93,133.48,210414,,,A*7E
Note that this disables select sentences, so if you’ll be re-purposing your Adafruit GPS unit in the future, you may use this command to reset it to its default sentences:
|
|
$ echo -e '$PMTK314,-1*04\r\n' > /dev/ttyAMA0 |
If that fails, removing the battery and unhooking the power for your unit will usually revert it to its old behavior.
# to make the “suppress all except GPRMC” permanent (survive reboots)
# let us modify /etc/rc.local, which is executed each time on boot:
mcedit /etc/rc.local
——————————–(quote)———————————
# Dmitry: I added this 3sec loop into /etc/rc.local to suppress all (except GPRMC) NMEA sentences
# have to do it more than once because sometimes it doesn't work from 1st attempt.
# todo: find more elegant way, ideally we’d keep trying until desired behaviour is confirmed
for i in `seq 1 6`; do
# send 6 times same command to GPS unit
echo -e '$PMTK314,0,1,0,0,0,0,0,0,0,0,0,0,0,0,0,0,0,0,0*29\r\n' > /dev/ttyAMA0
# use this to undo NMEA suppression (or cycle power on gps device):
# echo -e '$PMTK314,-1*04\r\n' > /dev/ttyAMA0
sleep 0.5
done
exit 0
—————————–(end of quote)——————————
This command squelches all of the other NMEA sentences and only outputs $GPRMC, making everything tick a little more efficiently. To verify that the proper sentences are being output, run:
# Tap CTRL+C to exit
$ cat /dev/ttyAMA0
$PGTOP ….
$GPRMC ….
In certain cases, it may take several tries in order to get the unit to recognize the command properly.
If you’re interested in playing around with the outputs, check out this PDF, and use this checksum calculator to get the value at the end (this means that if we change the line above, the *29 value changes when the command changes.. so we would need to calculate a new checksum!).
(end of quote)
end of 1st way to setup NTP server
Second (of two) way to setup NTP server:
This is “quick and dirty” method when no kernel recompilation required. Basically we install all the required packages, configure them and your NTP is ready to go, but it will deliver less accurate results, so I greyed out and left it here only out of respect to the other option, but it is not preferable way to build accurate NTP Stratum-1 server.
(quote)
Build ntp with ATOM PPS clock
The ntp package from the Raspbian distribution does not support the "ATOM" (PPS) reflock. You'll have to recompile it. To use the debian package sources, add a "deb-src" line to /etc/apt/sources.list:
deb-src http://mirrordirector.raspbian.org/raspbian/ wheezy main contrib non-free rpi
- Install the necessary packages:
- apt-get build-dep ntp
- Get the sources:
- apt-get source ntp
- Modify debian/rules:
- add –enable-ATOM to configure call
- Bump version number in debian/changelog to be just below the next version (using "~"):
- e.g. change 4.2.6.p5+dfsg-2 to 4.2.6.p5+dfsg-3~pps1
- Recompile the package:
- dpkg-buildpackage -b
- Install the new binary:
- dpkg -i ntp_4.2.6.p5+dfsg-3~pps1_armhf.deb
Configure NTP
- If you use DHCP, remove "ntp-servers" from the "request" line in /etc/dhcp/dhclient.conf
- Remove /var/lib/ntp/ntp.conf.dhcp if present
- Edit /etc/ntp.conf:
# pps-gpio on /dev/pps0
server 127.127.22.0 minpoll 4 maxpoll 4
fudge 127.127.22.0 refid PPS
fudge 127.127.22.0 flag3 1 # enable kernel PLL/FLL clock discipline# gpsd shared memory clock
server 127.127.28.0 minpoll 4 maxpoll 4 prefer # PPS requires at least one preferred peer
fudge 127.127.28.0 refid GPS
fudge 127.127.28.0 time1 +0.130 # coarse processing delay offsetserver ntp1.ptb.de iburst prefer # another stable preferred peer
server 0.pool.ntp.org iburst
server 1.pool.ntp.org iburst
server 2.pool.ntp.org iburst
server 3.pool.ntp.org iburst
remote refid st t when poll reach delay offset jitter
==============================================================================
oPPS(0) .PPS. 0 l 13 16 377 0.000 0.001 0.004
SHM(0) .GPS. 15 l 12 16 377 0.000 -1.313 1.787
*ptbtime2.ptb.de .PTB. 1 u 36 64 377 23.057 1.086 1.125
+rustime01.rus.u .PPS. 1 u 47 64 377 23.076 0.006 6.496
+sv-aglasterhaus 129.69.1.153 2 u 47 64 377 22.806 1.684 6.108
-ns2.derhil.de 131.188.3.220 2 u 45 64 377 23.166 -4.367 2.470
-alpha.rueckgr.a 129.69.1.153 2 u 55 64 377 27.045 -2.468 3.929
-ntp.perfact.de 130.133.1.10 2 u 45 64 377 31.004 -1.484 3.908
associd=0 status=0115 leap_none, sync_pps, 1 event, clock_sync,
version="ntpd … Sun Jan 6 19:01:13 UTC 2013 (1)",
processor="armv6l", system="Linux/3.6.11+", leap=00, stratum=1,
precision=-19, rootdelay=0.000, rootdisp=1.195, refid=PPS,
reftime=d494807e.342184bb Mon, Jan 7 2013 0:00:14.203,
clock=d494808b.d9329de3 Mon, Jan 7 2013 0:00:27.848, peer=36158, tc=4,
mintc=3, offset=0.000722, frequency=36.518, sys_jitter=0.003583,
clk_jitter=0.004, clk_wander=0.001
(end of quote)
end of 2nd way to setup NTP server withoug recompiling kernel.
Few screenshots when everything is working ok
First: minimal install – note mem usage and load
(no web server, no munin, just vanila plain OS + NTP)
Note: all these stats collected before we install apache server + munin, so
after you follow “Monitor your NTP server” section of this guide those numbers will be a bit more busier 🙂
root@chronos:/var/run# ntpq -p
remote refid st t when poll reach delay offset jitter
==============================================================================
oGPS_NMEA(0) .GPS. 0 l 1 8 377 0.000 -0.007 0.004
+bitdonut.co 128.105.39.11 3 u 29 64 377 27.498 -8.871 0.257
-ks4001083.ip-19 130.133.1.10 2 u 36 64 377 27.781 -10.701 0.812
+mx2.trentu.ca 132.163.4.101 2 u 35 64 377 9.401 0.558 2.062
+quaternary.serv 128.100.56.135 3 u 39 64 377 27.440 -7.842 0.334
root@chronos:/var/run# ntpq -c rl
associd=0 status=0418 leap_none, sync_uhf_radio, 1 event, no_sys_peer,
version="ntpd 4.2.7p440@1.2483 Mon Apr 21 17:38:30 UTC 2014 (1)",
processor="armv6l", system="Linux/3.13.10+", leap=00, stratum=1,
precision=-18, rootdelay=0.000, rootdisp=1.090, refid=GPS,
reftime=d6ffe1ca.f6d7043a Mon, Apr 21 2014 18:28:26.964,
clock=d6ffe1d1.e3225597 Mon, Apr 21 2014 18:28:33.887, peer=30861, tc=3,
mintc=3, offset=-0.004567, frequency=-13.270, sys_jitter=0.003815,
clk_jitter=0.004, clk_wander=0.003
2**(-18) = 3.8146e-06 less than 4 microsec precision! Yeah baby!!! 🙂
root@chronos:/var/run# free -m
total used free shared buffers cached
Mem: 485 65 419 0 11 24
-/+ buffers/cache: 30 454
Swap: 99 0 99
root@chronos:/var/run# df -h
Filesystem Size Used Avail Use% Mounted on
rootfs 7.1G 2.4G 4.4G 35% /
/dev/root 7.1G 2.4G 4.4G 35% /
devtmpfs 243M 0 243M 0% /dev
tmpfs 49M 212K 49M 1% /run
tmpfs 5.0M 0 5.0M 0% /run/lock
tmpfs 97M 0 97M 0% /run/shm
/dev/mmcblk0p1 56M 25M 32M 44% /boot
root@chronos:/var/run# uname -a
Linux raspberrypi 3.13.10+ #1 PREEMPT Mon Apr 21 04:02:37 UTC 2014 armv6l GNU/Linux
root@chronos:/var/run# ntpd –version
ntpd 4.2.7p440@1.2483 Mon Apr 21 17:38:30 UTC 2014 (1)
root@chronos:/var/run# cat /proc/modules
pps_gpio 2524 1 – Live 0xbf016000
pps_core 7883 2 pps_gpio, Live 0xbf010000
evdev 10596 2 – Live 0xbf009000
leds_gpio 2123 0 – Live 0xbf005000
led_class 4122 1 leds_gpio, Live 0xbf000000
root@chronos:/var/run# dmesg | grep pps
[ 10.978749] pps_core: LinuxPPS API ver. 1 registered
[ 10.986737] pps_core: Software ver. 5.3.6 – Copyright 2005-2007 Rodolfo Giometti <giometti@linux.it>
[ 11.001152] pps pps0: new PPS source pps-gpio.-1
[ 11.009688] pps pps0: Registered IRQ 193 as PPS source
root@chronos:/var/run# uptime
18:24:04 up 39 min, 1 user, load average: 0.16, 0.06, 0.06
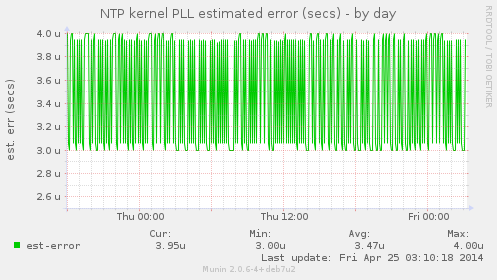
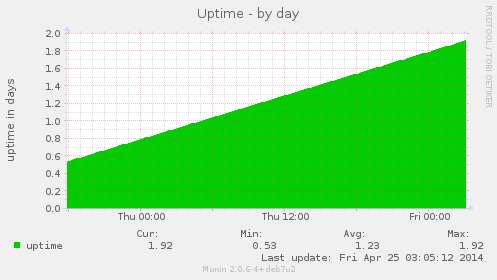
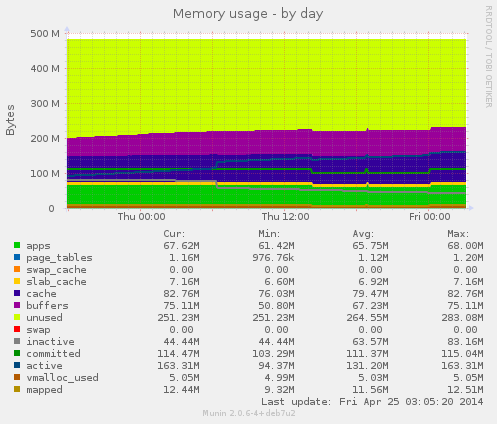
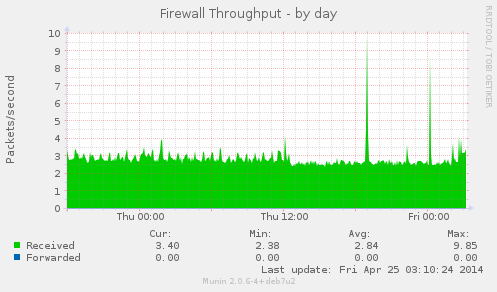
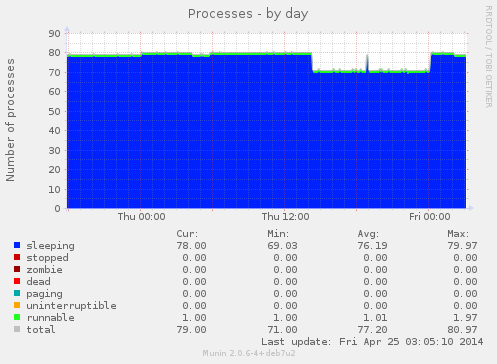
2nd set of screenshots after couple days of running with all extra (monitoring) pieces installed

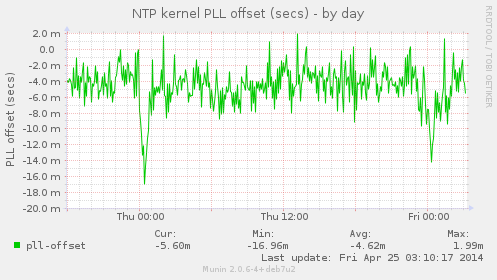
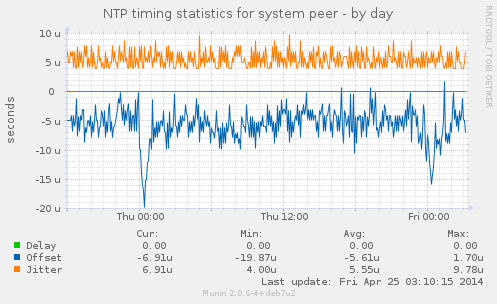
root@chronos:/# ntpq -p
remote refid st t when poll reach delay offset jitter
==============================================================================
oGPS_NMEA(0) .GPS. 0 l 8 8 377 0.000 0.001 0.004
-ks4001083.ip-19 140.203.204.77 2 u 47 64 377 28.154 -2.501 4.680
+quaternary.serv 128.100.56.135 3 u 23 64 377 28.408 0.579 11.495
*206.186.121.125 24.150.203.150 2 u 17 64 377 27.416 -6.724 13.706
+mx2.trentu.ca 204.34.198.40 2 u 55 64 377 12.539 1.765 2.696
root@chronos:/# ntpq -c rl
associd=0 status=0418 leap_none, sync_uhf_radio, 1 event, no_sys_peer,
version="ntpd 4.2.7p440@1.2483 Mon Apr 21 17:38:30 UTC 2014 (1)",
processor="armv6l", system="Linux/3.13.10+", leap=00, stratum=1,
precision=-18, rootdelay=0.000, rootdisp=1.000, refid=GPS,
reftime=d7045907.acb02fec Fri, Apr 25 2014 3:46:15.674,
clock=d7045908.44b898ff Fri, Apr 25 2014 3:46:16.268, peer=4601, tc=3,
mintc=3, offset=0.000436, frequency=-14.255, sys_jitter=0.005283,
clk_jitter=0.004, clk_wander=0.002
root@chronos:/# free -m
total used free shared buffers cached
Mem: 485 220 264 0 75 83
-/+ buffers/cache: 62 422
Swap: 99 0 99
root@chronos:/# df -h
Filesystem Size Used Avail Use% Mounted on
rootfs 7.1G 2.5G 4.3G 37% /
/dev/root 7.1G 2.5G 4.3G 37% /
devtmpfs 243M 0 243M 0% /dev
tmpfs 49M 200K 49M 1% /run
tmpfs 5.0M 0 5.0M 0% /run/lock
tmpfs 97M 0 97M 0% /run/shm
/dev/mmcblk0p1 56M 25M 32M 44% /boot
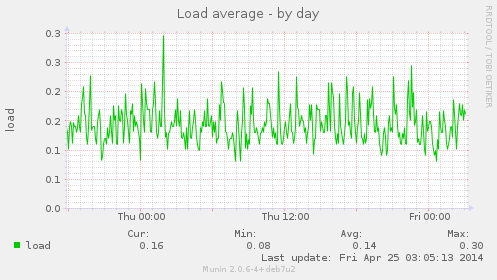
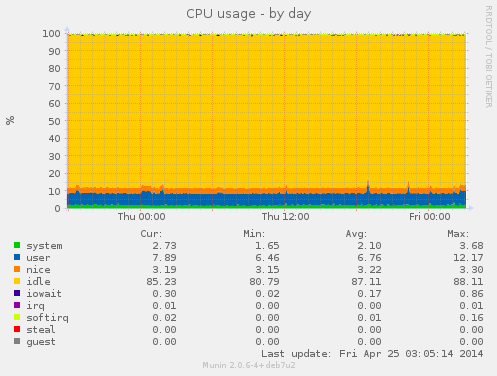
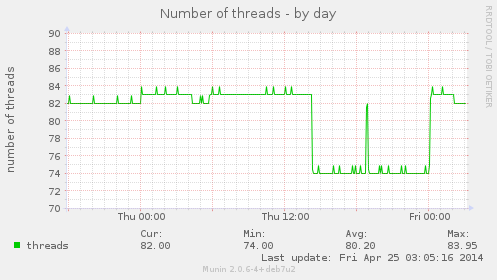
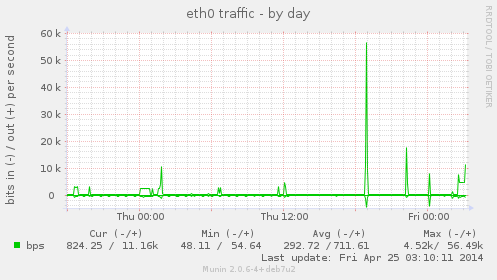
Monitor your NTP server
Apache + Munin (with NTP module enabled)
Install Apache Web Server
sudo su -l
apt-get install -y apache2 php5 libapache2-mod-php5
service apache2 restart
Install Munin
apt-get install munin munin-node munin-plugins-extra
Next, we must edit the munin configuration file /etc/munin/munin.conf. Uncomment the dbdir, htmldir, logdir, rundir, and tmpldir lines (the default values are fine). We want munin to use the name server1.example.com instead of localhost.localdomain in the HTML output, therefore we replace localhost.localdomain with server1.example.com in the simple host tree section.
mcedit /etc/munin/munin.conf
We should find the Apache configuration file for munin /etc/apache2/conf.d/munin (which actually is a symlink to /etc/munin/apache.conf) – it defines an alias called munin to munin's HTML output directory /var/cache/munin/www which means we can access munin from all web sites on this server by using the relative path /munin (e.g. http://www.example.com/munin).
Make sure you comment out the line Allow from localhost 127.0.0.0/8 ::1 and all Allow from all instead (otherwise you will only be able to access the munin output from localhost):
mcedit /etc/apache2/conf.d/munin
Restart Apache:
/etc/init.d/apache2 restart
Then restart munin:
/etc/init.d/munin-node restart
Make sure the NTP plugins are enabled in the /etc/munin/plugins directory.
test it!
http://your-host.com/munin/time-day.html
Replace Apache server with Nginx (to fully support munin cgi scirpts)
I noticed Munin works great, but when you choose to zoom-in some graph (and call server side cgi scripts) it fails. On forums others complained about non-well documented FastCGI dependencies/requirements, and I tried to modify apache config related to munin to make it work, but could not accomplish it within reasonable time (spent > 1 hr:), so I found other solution with much cooler web-server Nginx! 🙂
For now we’ll disable apache (without uninstalling) since Apache might be useful some day:
update-rc.d -f apache2 remove
apache2ctl stop
Setting Up munin on Ubuntu Server 13.04 with nginx
(by Victor Costan found here)
This post explains how to configure munin on a single Ubuntu 13.04 server that uses nginx.
Monitoring is supposed to save time by debugging and predicting / avoiding catastrophes. However, setting up munin on Ubuntu was a time-consuming trial-and-error process for me. The official instructions and various blog posts that cover this topic skip important steps, such as having monit's FastCGI processes start automatically at boot time. I have documented the setup that worked for me, hoping that others can reuse my work.
Ubuntu packages
Run the following command to install the packages needed for munin.
sudo apt-get install munin munin-node spawn-fcgi libcgi-fast-perl
The following sections configure the munin packages.
munin configuration
Write the munin configuration below to /etc/munin/munin-conf.d/90-fcgi
graph_strategy cgi
html_strategy cgi
cgiurl_graph /munin/munin-cgi-graph
nginx configuration
Write the nginx configuration below to /etc/nginx/sites-enabled/munin.conf
server {
listen 443 ssl;
listen 80;
charset utf-8;
server_name 192.168.3.8 your-pi-address.com; # Note here you’d put your hostname and/or IP. I put both.
# more info: http://nginx.org/en/docs/http/server_names.html
location ~ ^/munin/munin-cgi-graph/ {
fastcgi_split_path_info ^(/munin/munin-cgi-graph)(.*);
fastcgi_param PATH_INFO $fastcgi_path_info;
fastcgi_pass unix:/var/run/munin/fastcgi-graph.sock;
include fastcgi_params;
}
location /munin/static/ {
alias /etc/munin/static/;
expires modified +1w;
}
location /munin/ {
fastcgi_split_path_info ^(/munin)(.*);
fastcgi_param PATH_INFO $fastcgi_path_info;
fastcgi_pass unix:/var/run/munin/fastcgi-html.sock;
include fastcgi_params;
}
location / {
rewrite ^/$ munin/ redirect; break;
}
}
This configuration assumes that you have a DNS entry set aside for reaching the monit pages. I have separate DNS entries for all my applications, and they're all CNAMEs for the (same) machine that they're running on.
Once you're done tweaking the script, reload nginx.
sudo /etc/init.d/nginx reload
FastCGI daemons
Write the script below to /etc/init.d/munin-fcgi
#!/bin/bash
### BEGIN INIT INFO
# Provides: munin-fcgi
# Required-Start: $remote_fs $syslog $network
# Required-Stop: $remote_fs $syslog $network
# Default-Start: 2 3 4 5
# Default-Stop: 0 1 6
# Short-Description: Start munin FCGI processes at boot time
# Description: Start the FCGI processes behind http://munin.*/
### END INIT INFO
graph_pidfile="/var/run/munin/fcgi_graph.pid"
# Ubuntu 12.10: /usr/lib/cgi-bin/munin-cgi-graph
graph_cgi="/usr/lib/munin/cgi/munin-cgi-graph"
html_pidfile="/var/run/munin/fcgi_html.pid"
# Ubuntu 12.10: /usr/lib/cgi-bin/munin-cgi-html
html_cgi="/usr/lib/munin/cgi/munin-cgi-html"
retval=0
. /lib/lsb/init-functions
start() {
echo -n "Starting munin graph FastCGI: "
start_daemon -p ${graph_pidfile} /usr/bin/spawn-fcgi -u munin -g munin \
-s /var/run/munin/fastcgi-graph.sock -U www-data ${graph_cgi}
echo
echo -n "Starting munin html FastCGI: "
start_daemon -p ${html_pidfile} /usr/bin/spawn-fcgi -u munin -g munin \
-s /var/run/munin/fastcgi-html.sock -U www-data ${html_cgi}
echo
retval=$?
}
stop() {
echo -n "Stopping munin graph FastCGI: "
killproc -p ${graph_pidfile} ${graph_cgi} -QUIT
echo
echo -n "Stopping munin html FastCGI: "
killproc -p ${html_pidfile} ${html_cgi} -QUIT
echo
retval=$?
}
case "$1" in
start)
start
;;
stop)
stop
;;
restart)
stop
start
;;
*)
echo "Usage: munin-fcgi {start|stop|restart}"
exit 1
;;
esac
exit $retval
Make the script executable, and fix some permissions while you're at it.
sudo chmod +x /etc/init.d/munin-fcgi
sudo chown munin /var/log/munin/munin-cgi-*
Now that the init.d script is in place, start it and have it run on every boot.
sudo /etc/init.d/munin-fcgi start
sudo update-rc.d munin-fcgi defaults
/etc/init.d/nginx start
Debugging munin+nginx
You should be able to point your browser to http://munin.your-domain.com and see many graphs. If that doesn't work out, the logs below should give you a clue as to what went wrong.
- /var/log/nginx/error.log
- /var/log/munin/munin-cgi-graph.log
- /var/log/munin/munin-cgi-html.log
It is working!!!

Other somewhat related links
How to contact Dmitry
why? please don’t!
kidding.. here you go: green447 at gmail com
How to overclock raspberry pi
http://www.jeremymorgan.com/tutorials/raspberry-pi/how-to-overclock-raspberry-pi/
An aside – what is a module in Linux?
You may be used to the idea of device drivers for Windows – those .SYS files – but what are "modules" in Linux and how do they relate to device drivers? I asked that question on the time-nuts list, and got this reply from Michael Tharp:
"Linux modules are the same, although Linux modules almost always need to be compiled against the specific kernel version while Windows drivers are typically only bound to which release you're running. That is the reason you have to compile the kernel, rather than just plop down a driver downloaded from the internet.
"That said, the reason your PPS driver is a module is that it makes it easier to tweak options. Almost all modules that are part of the main kernel source (which PPS is, for a year or so) can be compiled in rather than as a separate module, but you can pass options to a module as you load it while you cannot do that with a built-in. It also makes it possible to tweak the source, recompile just that module, and test it on the fly rather than recompiling the entire kernel and rebooting."
Many thanks, Michael.
———————————————————————————-
some random, but somewhat related notes:
from:
Cross-Compiling for Raspberry Pi
http://www.kitware.com/blog/home/post/426 lots of related stuff including this suggestion:
– I have had problem linking "more advanced" c++ libraries when using gcc-4.7 for cross compiling. Raspbian used gcc 4.6.3. Using exactly the same version made these linker problems go away.
LinuxPPS
http://linuxpps.org/wiki/index.php/Main_Page
making backup image from SD cards:
http://smittytone.wordpress.com/2013/09/06/back-up-a-raspberry-pi-sd-card-using-a-mac/
diskutil list
/dev/disk0
#: TYPE NAME SIZE IDENTIFIER
0: GUID_partition_scheme *750.2 GB disk0
1: EFI 209.7 MB disk0s1
2: Apple_CoreStorage 749.3 GB disk0s2
3: Apple_Boot Recovery HD 650.0 MB disk0s3
/dev/disk1
#: TYPE NAME SIZE IDENTIFIER
0: Apple_HFS Macintosh HD *749.0 GB disk1
/dev/disk3
#: TYPE NAME SIZE IDENTIFIER
0: *7.9 GB disk3
Nebulon:pi dmitry$ sudo dd if=/dev/rdisk3 bs=1m of=./pi-8g.11-Apr-2014.img
dd: /dev/rdisk3: Input/output error
0+0 records in
0+0 records out
0 bytes transferred in 0.006882 secs (0 bytes/sec)
Nebulon:pi dmitry$ watch -n 1 'ls -l /dev/di*'
Nebulon:pi dmitry$ time sudo dd if=/dev/rdisk3 bs=1m of=./pi-8g.11-Apr-2014.img
7861174272 bytes transferred in 178.477878 secs (44045651 bytes/sec)
real 2m58.492s
user 0m0.027s
sys 0m5.438s
or use GZIP on the fly (twice slower, but IMG is 2G vs 8G raw):
Nebulon:pi dmitry$ time sudo dd if=/dev/rdisk3 bs=1m | gzip > ./pi-8g.11-Apr-2014.img.gz
Password:
7497+0 records in
7497+0 records out
7861174272 bytes transferred in 347.212174 secs (22640837 bytes/sec)
real 5m52.490s
user 3m6.852s
sys 0m7.190s
Nebulon:pi dmitry$
* * *
# and now let us restore SD card content from IMG:
sudo dd if=/dev/rdisk1 bs=1m | gzip > ~/Desktop/pi.gz
Re-flashing the SD card then becomes:
gzip -dc ~/Desktop/pi.gz | sudo dd of=/dev/rdisk1 bs=1m
[Q] What is NTP?
[A] http://www.ntp.org/ntpfaq/NTP-s-def.htm
also clock quality:
http://www.ntp.org/ntpfaq/NTP-s-sw-clocks-quality.htm
Gps for Beginners (by Garmin)
http://www.mwri.gov.eg/PDF_files/GPS-for-Beginners.pdf